

 |
| From burrito pillowcases |
Each month, we can pick up donated fabric, make the pillowcases and then turn them in when they are finished.
While everybody has their own favorite way to make pillowcases...and we all think ours is just a 'wee bit' better....I LOVE mine! I use a variation of the burrito pillowcase technique that I got from guild, but that I have seen before called a 'magic' pillowcase.
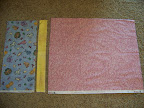
Fabric required:
All measurements are by width of fabric, 44/45"
27" piece for body of pillowcase (27"x 44/45")
9" co-ordinating cuff piece (9"x 44/45")
2" contrasting narrow trim piece (2" x 44/45")
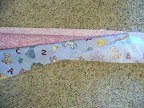
Step 1 Assemble three pieces: trim, cuff, body
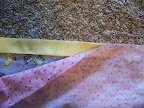 Step 2. Take trim piece, fold in half ,press flat
Place between right sides of cuff and body
Step 3. Now, all three are almost in position for pinning together, just make sure your trim piece is ride sides together, and between both the cuff and the body's right sides, as well. But you must make your burrito before you make your magic!
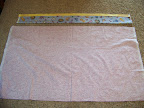
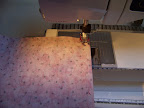
Now,just take the body section (pink) and roll it up (like a burrito) until you can see the trim piece from underneath. This insures that no rolled edge gets accidentally sewn in. The roll is simply encased within, except at the one top seamed edge!
Step 4.
Take the bottom edge of cuff (blue) and flip it up and over the burrito'ed body section.
Line up top with cuff and trim edges. You will now have five layers pinned and ready to sew as shown below.
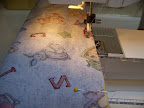
Step 5. Sew all of the layers together, using about a 1/2" seam allowance. Note that it will appear to be a very narrow.... almost too small to be correct, but it is....section as you sew this little burrito roll-up's long seam. Just make sure there are 5 layers in your seam and the rolled up edge is not accidentally sewn in, just encased within the burrito!

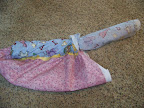
Step 6. To turn the burrito right side out...
Remove all pins. Now reach inside of your 'burrito' roll and pull all of the fabric out of one end of your tube.
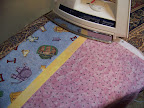
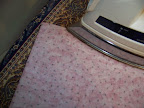
Step 7. Take this pillowcase section and press flat.
Be sure to iron the trim towards the body.
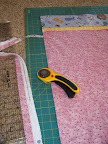
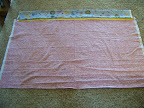
Step 8. Trim side edges of body of pillowcase.
Step 9. Sew a French (encased within) seam.
With wrong (exactly the opposite of what is usual)sides together, sew both sides and bottom of the pillowcase using a 1/4" seam.
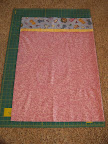
Step 10. Press flat and turn right side out.
Step 11. Sew the (now encased) sides and bottom in a 5/8" seam, simply turning the corners as you. (Less than this may leave strings showing).
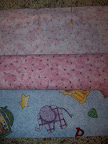
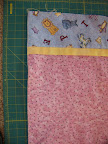
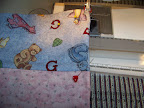
Step 12. Turn right side out, press again, and admire your finished pillowcase!
NOW....make a lot more of them before you forget the technique;)
More ideas from all around the world! Thanks to the reader who sent me this list!
Pillowcase tutorials on Australian sites...
- How to Sew a Pillowcase - A Spoonful of Sugar
- Fat Quarter Pillowcases - Nanny Craft 4U
- Learn to Sew Pillowcase Tutorial - Flower Press
- Standard Pillowcase - Nanny Craft 4U
- Pillowcase Patterns - Spotlight
- Embellishing a Pillowcase with Hexagons - A Spoonful of Sugar
Pillowcase tutorials on U.K. sites...
- How to Make a Pillowcase - We're in Stitches
- Cloud and Sun Appliquéd Pillowcase Tutorial - miy DIY
Pillowcase tutorials on U.S. & Canadian sites... as far as I can tell these are all U.S. or Canadian sites. Some were a little hard to gauge.
With Heart and Hands: Burrito or Magic Pillowcase Tutorial
(this one of course!)
- Banish Percale Forever - Stop Staring and Start Sewing
- Easy Pillowcase Tutorial - Sew Mama Sew
- One Million Pillowcase Challenge - American Patchwork & Quilting
- A Five Minute Pillowcase How To - Simple Simon & Co
- Ten Minute Pillowcase - Little Bit Funky
- Chevron Flag Pillow Cover - Stubbornly Crafty
- Posh Pillowcases - You Go Girl
- Quick Pillowcase Tutorial - 44th Street Fabric
- ConKerr Cancer Pillowcases - MADE
- Various Pillowcase Tutorials - One Million Pillowcases
- Ruffled Pillowcase Tutorial - Piece N Quilt
- Pretty Quick Pillowcase Tutorial - Film in the Fridge
- Easy Pillowcase with Contrasting Hem - Lazy Girl Designs
- Envelope Closure Pillowcase - Make It & Love It
- Ten Minute Pillowcase Tutorial - Little Bit Funky
- Sewing a Pillowcase - Education Possible
- Reversible Pillowcase Tutorial - Tidbits
- DIY Perfect Pillowcase - Living with Punks
25 comments:
That's exactly what I'm going to have to do. Thanks, I'm saving these directions!
Thanks for the instructions, I need to make a couple of these for my grandkids when they come to visit in 3 weeks.
This is a nice idea, wonderful in its simplicity and prettiness. And good for you for doing something with it to add more goodness into the world!
Thank you for this great tutorial...I came over through Debi.
Michele, please e-mail me. I live in Salem and would love to share a personal quilt story with you that you may be connected to. Thanks - jkmartin55@yahoo.com Judi
Best version I have seen, thanks!!
Thanks for the tutorial! Tonight i made my first pillow case set!
Best magic pillowcase tutorial I've ever seen and I've seen quite a few!
Thanks. This is a great tutorial.
Great Tutorial. When I have made these, the trim piece is pressed wrong sides together. How does it work the other way?
Oh, thank you. I'm so excited to see this. A friend of mine just explained it over the phone, and this will help me so much. Love your website.
You lost me on #9. Putting the band on was easy...but finishing seemed impossible with your directions.
Wintersewist,would it help to watch a video of it?
http://www.youtube.com/watch?v=7moryq_ZRFY
Love your tutorial on the Pillow Case. I did one like this before and couldn't remember how I did it.
This is a big help. Do you know if this would be the same way to put decortative fabric on the bottom of Cloth Diapers for burp cloths?
If not would you by any chance havea tutorial for doing burp cloths?
Thanks
Michele
Hello, other Michele! You came up no reply, as I am too, now. Something is wrong with blogger. But yes, works the same exact way. Here is a cute tute: Moda Bake Shop: Baby Burp Cloth and Bib Tutorial
Our quilt club uses this same technique only we call it the Hot Dog pillow case
I make these for Mott Children's Hospital in Ann Arbor Michigan. Every child gets their own pillow case to take home.
Use a bit more body material for a King pillow. I made a pair for my aunt while she was in rehab after a hip operation. They make great gifts!
Quick help! Should that narrow trim piece be folded Wrong sides together? It says right, but I can't visualize how that would work. Help? Thanks! :)
Step 2. Take trim piece, fold in half ,press flat
Place between right sides of cuff and body.
The TINY trim piece is ironed wrong sides together and stays intact as a trim piece no matter what.
It is then placed between RIGHT SIDES OF CUFF AND BODY.
The burrito part before it is sewn looks silly..check the photos, but that's the magic!
please give both dimensions of fabric pieces needed 27" x ?
Is this something that is now understood by avid sewers? I haven't sewn much in years....
Used to be we had 36", 45" and 60" bolts of cloth. What is used in this pattern?
For those who haven't sewn in a while, WOF...width of fabric for most current fabrics in the U.S is 44"/45"...that means your fabric width should measure somewhere between 44" and 45". Older 36" fabric will work but it makes for smaller pillowcase.
How much fabric do you trim off the edges of the body in step 8?
Sharon...it is simply if there IS unevenness...so if you used older fabric that is narrower, or used a lengthwise vs crosswise or vice versa cut...that kind of thing. Just even up the edge so you have a neater looking seam..that's all! Have fun and hope you make some, they are great fun!
How do you cut and place fabric when 1. using horizontal patterned fabric for body and 2. putting name on cuff please?
I love these pillows I have a larger horizontal pattern for the body. How do I cut and place this when assembling the "burrito? ALso, I am adding a name to each cuff. How do I place the name correctly so it is at the end of the l to r print of the body? Thank you?
Post a Comment