
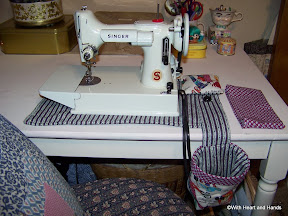

My new (1964) Singer Featherweight sewing machine had barely come through the door...er chimney...in December and I couldn't wait to immediately make her a new set of 'clothes'.
She is destined for being brought to many charity and guild group sew-along's so I knew that just like her bigger sister's, she needed accessories! Out came the gridded design table and sketches of a little table mat, a dual purposed snippets and scrap bag (that can later be unbuttoned for storing her little foot pedal as it tucks within her 'throat' area for travel) and a tiny wool filled pincushion...perfect for sitting on top of and protecting her motor casing during travel.
For those of you not familiar with these little 'green' featherweights (which is what they were called when production began in Clydebank, Scotland in 1964) they are actually a faint green that most people see as 'white' or perhaps 'slightly off-white' until something truly white is held up next to them. I have also heard the color called mint, aqua, and Singer originally called it turquoise!!!!
The traditional antique looking black model was produced from 1933 through the fifties and are the easiest to find, then the white or 'green' ones and finally the most rare...the tan ones.
I could have wished for a little black one ( as my local source had many black ones to choose from) but for reasons I can't explain, the little white one stole my heart. I changed my mind in a heartbeat after wanting a traditional black one for forever! Being frugal, I deliberated for almost a year before actually making the purchase...er, putting in on my Christmas wish list ;) And now, I feel so blessed to have one of my own and just adore her!
Here is a quick"photo tutorial" for the sewing of my featherweight sewing accessories and a link to all of the many other sewing accessories I have previously offered on this blog. For this tutorial, I am only giving simple directions ..you use the pattern and the sizes given to cut your pieces in fabrics of your choice, then create the sections using the photos to figure out how I put it together. Check other patterns in my bigger list for more info or other peoples if my simple directions are too hard for you to follow. Mine is basic as I created it as I went along and you may want your own changes.


Supplies needed:
Assorted fabrics, thin fleece like batting, two buttons, one buttonhole ;)
Cutting Directions:
Sewing machine mat--cut two pieces of fabric and one piece of fleece batting 10" x 18"
Snippets bag--for body cut one exterior piece, 1 lining piece, 1 batting piece (all 7" x 8") a snippets cuff section, outside section, plus a lining section in an alternate prints 4" x 8"each, one section for hanging/buttoning strap 5" x 8".
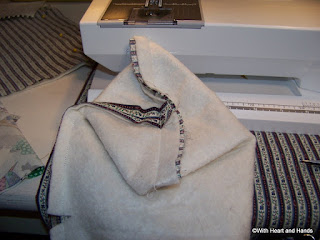
Pillowcase sleeve for fold up bed of machine--it's cutting size ended up as 9" x 9". This gives allowance room for the turn under opening edge and 1/2" seams.
Pincushion/motor protector--small rectangle, 4" x 5" finished. It is placed on top of the motor in the back of the machine to protect it and as a tiny pincushion at group.


Cut two pieces of fabric and one piece of fleece batting each 10" x 18".
Sew together the 3 mat fabrics...the 'pretty or right side of the outside fabric you want to be able to see, to the pretty or right side of the back or lining section, sewn to the fleece batting section. In other words, want your two primary fabric on facing each other, with the batting on top of the back or wrong side of one of them.
Sewing all around the sections together but leaving an opening for turning. Turn right sides out, batting enclosed within, then hand sew the turning opening closed.
2. Snippets bag. Seam outside section on main seam closed. Do the same for the lining with fleece to wrong side.
Snippets bag--for body cut one exterior piece..7" x 8", 1 lining piece7" x 8", 1 batting piec e7" x 8"
plus a snippets cuff section...width you would like, an outside section, plus a lining section in an alternate prints all are 4" x 8"each, one section for hanging/buttoning strap 5" x 8".


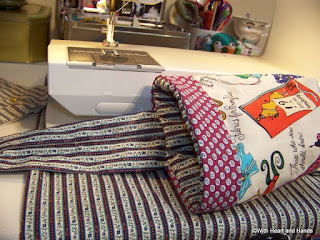
3.Strap:
Make a little hanging tab or strap, as shown, and seam it into the lined cuff section. Stitch all pieces to the top opening of the bag.
4. Two buttons and one buttonhole
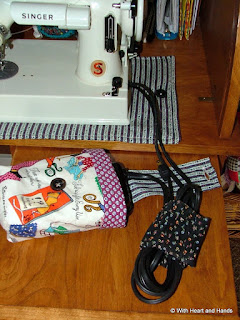
Add a little button to the mat and add a little buttonhole to the snippet bag strap for attaching it as shown in very top photo. I also added another button to the front of the snippet and scraps bag...the strap with the buttonhole that attached the snippet bag to the mat, can now be used to close up the little bag...holding the foot pedal inside for putting away or bringing to a sewing group.

5. Make a simple little pillowcase bag to fit over the sewing machine bed which folds up for travel in a featherweight machine. Optional pincushion, shown above on right , can also be used to cushion the motor when packing the set up and traveling.
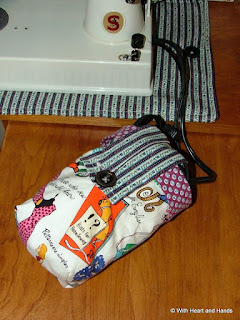

6. Pack as shown above. Sleeve onto bed, foot pedal tucked in snippet bag (which I unbutton from mat for travel) Little pincushion is shown above right by button is placed over motor when traveling.
Find this tutorial and others, including making a larger mat and snippet bag for a general sewing machine at: With Heart and Hands: Free Sewing Room Accessories Patterns
13 comments:
What a wonderful featherweight machine. I enjoyed the tutorial and information about the machine.
I love your blog post on your new baby. I have a green one too. They are truly worth MY weight in gold...that's alot! Liz from Germany did a post some time ago on her little black one that she made pajamas for, very cute blog. Do stop by my blog for a giveaway for a wooly kit for you and anyone who says you sent them. Oh, Liz's blog is
http://liz-moments.blogspot.com/search?q=featherweight
Have a great day, Elaine
I have been wanting a Featherweight for a few years now, but you have ruined it for me. Now I want this little aqua one! It has stolen my heart, too! Thanks for sharing this. I enjoyed your tutorial and reading about your new machine. Sigh. Something else for my wishlist! There really is a Santa, right Virginia...I mean, Michele?
Your 'baby' is just so cute! The accessory tute is an added bonus. Want to know what I did to 'protect' the fold up portion of the base? I put one of those rubber bumpers (that you find on kitchen cabinet doors) on the screwhead of the machine so it wouldn't scratch the paint. Works just fine and I can take it off if I need to do so.
Congratulations on your new machine. I appreciate all the details you shared as I don't always think of such things but the info helps a lot. I love the projects you're making.
Hi! De-lurking to thank you for this tutorial! I bought a Featherweight last year and this is just what I need to dress her up for travel!
Thank you for this info...aren't those little machines just wonderful? I love my little blackie!
Yes...yes....I have always wanted one....I never thought about it needing 'accessories'!! Great tutorial!!!
I've never seen a white Featherweight! She's so cute! I would have changed my mind in a heartbeat too if I'd seen her. (Although I confess I've never really wanted a Featherweight.)
A friend of mine in the US has the "green" one and her sister has the "pink" one. They have had them since new! I did idly mention once when she was mùoving house and putting everything in storage and if she needed someone to "store" her Featherweight, she'd need look no further. Unfortunately she knows me to well and the offer was not taken up!
I dream that one day a Featherweather will be mine.
You post so many great ideas. I love stopping by!
Lynda
You post so many great ideas. I love stopping by!
Lynda
Well aren't you just the cleverest! My little 'Frankie' is getting ready for her first road trip and certainly cannot leave our home without some nice, new accessories...Thank YOU - these are Perfect!!
~Deb
Post a Comment