
March is National Quilting Month and as such it is a wonderful opportunity to focus on the art of sewing and quilting and their use in our lives and in the lives we touch with our love of these arts.
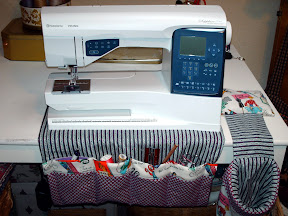
As part of this focus, I have been working on getting re-acquainting with my new Viking Sapphire 870 Quilt, and learning to use its abilities along with my own. Wanting to keep her happy and healthy, I decided to create a few new accessories to make our mutual sewing experience more enjoyable.
Searching online for a pattern for a sewing machine mat with pockets and other accessories, I found limited patterns available. So, I decided to just design and create my own!
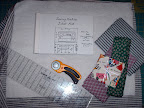
1. Using basic supplies and fabric from stash, meant to co-ordinate with the variety of colors and fabrics already present in my sewing room, I used graphing paper to draw a simple design based on the extended length of my sewing machine. A Sapphire 870 has a 10" throat which is a great sewing space for machine quilting. But this same pattern will also work on a smaller machine...you'll just have more of the mat showing on the sides, than I do, here.
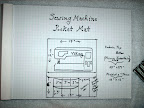
2. Measuring the length of my machine and deciding how long I wanted the pocketed area to drop down, I determined that I needed it long enough to hold small scissors and ruler, but not so long as to interfere with my lap or legs as I sewed. I also decided to add on simple pockets with just enough room to slip in sewing accessories, without their being too bulky or deep.
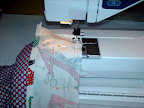
3. The design is simply a front fabric, a piece of batting and a backing fabric, all shown here. The pocket trim piece is made ahead of time and pinned to the right outside of the front fabric.
This is like creating a place mat with the pocket trim section already attached to the right side. At the above right, you can see the trim piece that I also added as a decorative touch. Once this end is folded up and to the right side, you will be creating the actual 'pockets'.The layers are sandwiched together, right sides together for sewing closed...with a space left open for turning right side out.
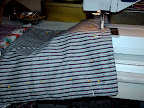
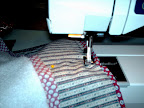
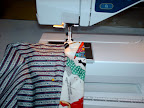
4. After flipping to the right side, edge stitch around finished unit.
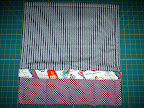
5. The finished unit becomes self-explanatory. The larger unit, the placemat shape, if you will, is simply folded up and to the right side, now showing the back fabric. This fold creates a simple way of creating pockets. Notice how it is just like a place mat with a flipped over pocket unit at the front bottom. At this point, sew stitching lines from folded over section (trimmed edge shown here) on down...to created the pocketed sections...stitching lines for sizing width of pockets as desired.
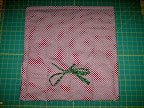
6. The back of this sewing machine pad has an added tie stitched on. I open this bow and use it to tie around the rolled up piece, when I need to transport it to sewing group. The rolling up keeps all of the accessories neatly in place and the tie secures them there. I have transported it several times now to my community quilting group and it has worked nicely!
It's far easier to make a mat like this than it is to explain how to make one! Draw yourself a simple pattern and the explanations will be much clearer as you experiment. Now that I actually made myself one, I wish I had done it years ago. I just absolutely love having it!
Add a snippet bag for thread and fabric scraps as I have here (mine also protects my sewing machine cords from damage and from view)and you have custom made sewing accessories, that are both fun and incredibly useful!
6 comments:
I've been eyeing mats like this, and unable to find patterns as well, but have been too lazy to create one myself. You're right though, it doesn't look hard, and if I design it myself, I can customize it exactly for my needs.
I like it but doesn't it prevent you from sitting close to the machine.
Mama Bear
Mama Bear...your email isn't set up to reply personally. I made these pockets without gussets just for this reason! It only sticks out 1 1/2" even with scissors and thread in the pockets...less than a quilt would bunched in for machine piecing or quilting. Just don't make it too long to hit the legs. Mine works really well :)
I've been thinking of making one of these to put under my Featherweight. My Bernina sits down into the cabinet top so it wouldn't be practical. Like Shelina, I've been a bit lazy.
You are always thinking up interesting things. My machine might be very happy with a little more of my attention and the mat is a nice brightener. I'll keep it in mind!
Hello from Australia..
Love the Sewing Machine Pad with pockets.
My friend Jo and I are going to try one now....will let you know how we get on.
Take care...
Post a Comment