


Pat loves teddy bears and Elvis (can you tell? I mailed her an Elvis and she loved it 😊


As a lifelong volunteer, sewist, crafts person, and of course quilter--I joined in a crazy huge "Salem Health: Community Hospital and Clinics" surgical masking making community project.
Salem Health hospital workers created kits using small sheets of polypropylene based medical grade paper-fabric to be given out to volunteers.


Kits included sheets of hospital grade paper-fabric and instructions to create pleated surgical masks with ties.
We were to make them in a few days then return them at designated locations to hospital staff volunteers.
It ended up as an enormous community volunteers response event!


Volunteers ended up finishing 11,000 surgical masks for Salem Health over the following week turning them in at a local parking location just as they were picked up.
Fantastic community response and effort!


As sewists (previously called sewers) began the huge movement that was to come, Facebook, Instagram, blogs and even twitter accounts began to share their first and often daily attempts to find a mask pattern from the crazy rush everyone had to suddenly create, --we all searched the Internet, social media and even watched Youtube videos.

Making a Child Sized Face Mask or Mask Covering with Adjustable Pleats
Ages 4 -12
Cut out 2 pieces cotton fabric 5"x 7"
Cut out 2 pieces 1/8" soft elastic
6" long
Ages 2-4
Cut 2 pieces cotton fabric 4" x 6"
Cut out two pieces 1/8" soft elastic
5" long
** Warning **
NO Fillers Should Be Used
For Children's Masks!

Mask Covers
Same measurements for fabric
Ages 4-12 6" x 7"
Ages 2-4
5" x 6"
(No additional eleastic needed as
Super soft elastic already on hospital mask)
Simple Slide over mask through open ends, adjust in center
All: make 1 central box pleat or 2 small downward pleats as desired .

Making surgical mask covers. They can be removed, washed, replaced as needed. These were child sized using a sample OHSU/Dornbecher mask..

As most of us began our COVID-19 mask making frenzy we did not yet know what might work best, or was perhaps the safest to use for different ages.
Nor did we realize that while hepa filters (i.e. using new vacuum cleaner bags for example) might work extremely well to keep out the viral droplets and protect ourselves from others' as well as others from ourselves
from their viral droplets, they were very hard to breathe through and potentially dangerous for small or those older adults or people with respiratory illnesses like asthma.
None of our DIY (i.e.homemade) masks are hospital grade. When we makes them using hospital provided polypropylene paper-fabric they are of a quality such as their own surgical masks but are not made in certified conditions.

** warning!
So be very careful to continually wash your hands while sewing! (Or repeatedly use hand sanitizer)
And keep pets and others away from contact with them and do not try them on yourself unless that specific mask is to be kept by you for your own use!
Most of us started sewing without even noticing much except we could follow the directions! Forget testing them, dozens were made as tests and still given away to anyone who'd take them!
Now we should all know better and do better!


For trying them on (someone else's mask?) or waiting for the science to catch up with the passion to help in any way that any of us could. We were rocking and on a roll! Now, we all need to follow the facts and the science!
My grandchildren's beloved and long suffering their own pretebd medical care our stuffed animal toy monkey!
And he was the perfectly sized model as big bear was off playing somewhere.

Only one willing model testing buttons on a hat as a way to wear a mask without hurting the ears.

Worked really well. No complaints !

I read through patterns with errors and viewed masks that had issues. Great big hearts and super willing and helpful hands were all well intended but we all learned that some things worked better than others.
We listened to the news and knowing that numbers were increasing and masks were limited (and/or disappearing from hospital visitor stands right in front of cancer patients coming in for their often daily chemo or radiation) increasing problems for
those needing them first and most.

We all felt an even greater need to start making masks and as oftrn requested mask coverings for hospital masks in constant use where a removable cover could be washed, dried and replaced immediately-- and many of us did.
It has been an amazing experience reading and seeing so many many, many people who had not even sewn in years and years suddenly sewing like crazy!


And everyone sharing their materials with not only friends and acquaintances but even online group members in their or nearby cities. Mailing envelopes of elastic or extra sewing machine needles or dropping bags of fabric off at doorsteps!

Here are just a variety of masks that came across my feeds. I included screenshots of their posts so credit is given when it was known. It helps spark ideas of the creativity of crafters everywhere, something I love and celebrate!

The Valami

Ami Simms and friend Vali created a great one pattern fits all.
(I personally substituted wires top and bottom for nose and chin pleats.)

Note: if you take a masked selfie late at night with poor lighting don't forget to "smize"--smile with your eyes! 😷
I forgot 🤣
HOME | Valami Face Mask
https://www.bestdiyfacemask.org/
More pics of different looks:
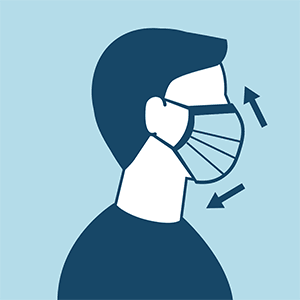
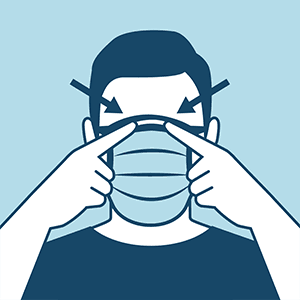
Cloth face coverings should—
- fit snugly but comfortably against the side of the face
- be secured with ties or ear loops
- include multiple layers of fabric
- allow for breathing without restriction
- be able to be laundered and machine dried without damage or change to shape
CDC on Homemade Cloth Face Coverings
CDC recommends wearing cloth face coverings in public settings where other social distancing measures are difficult to maintain (e.g., grocery stores and pharmacies), especially in areas of significant community-based transmission.
CDC also advises the use of simple cloth face coverings to slow the spread of the virus and help people who may have the virus and do not know it from transmitting it to others. Cloth face coverings fashioned from household items or made at home from common materials at low cost can be used as an additional, voluntary public health measure.
Cloth face coverings should not be placed on young children under age 2, anyone who has trouble breathing, or is unconscious, incapacitated or otherwise unable to remove the mask without assistance.
The cloth face coverings recommended are not surgical masks or N-95 respirators. Those are critical supplies that must continue to be reserved for healthcare workers and other medical first responders, as recommended by current CDC guidance.
Should cloth face coverings be washed or otherwise cleaned regularly? How regularly?
Yes. They should be routinely washed depending on the frequency of use.
How does one safely sterilize/clean a cloth face covering?
A washing machine should suffice in properly washing a face covering.
How does one safely remove a used cloth face covering?
Individuals should be careful not to touch their eyes, nose, and mouth when removing their face covering and wash hands immediately after removing.
Sew and No Sew Instructions
Sewn Cloth Face Covering
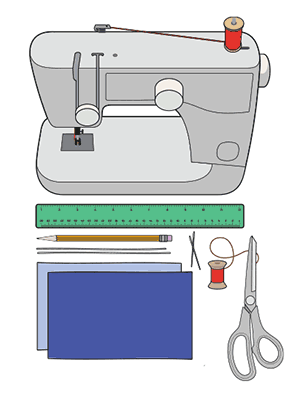
Materials
- Two 10”x6” rectangles of cotton fabric
- Two 6” pieces of elastic (or rubber bands, string, cloth strips, or hair ties)
- Needle and thread (or bobby pin)
- Scissors
- Sewing machine
Tutorial
1. Cut out two 10-by-6-inch rectangles of cotton fabric. Use tightly woven cotton, such as quilting fabric or cotton sheets. T-shirt fabric will work in a pinch. Stack the two rectangles; you will sew the mask as if it was a single piece of fabric.
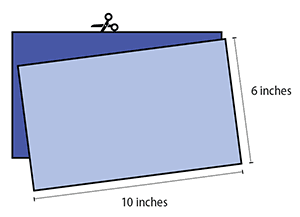
2. Fold over the long sides ¼ inch and hem. Then fold the double layer of fabric over ½ inch along the short sides and stitch down.
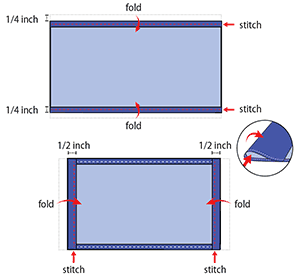
3. Run a 6-inch length of 1/8-inch wide elastic through the wider hem on each side of the mask. These will be the ear loops. Use a large needle or a bobby pin to thread it through. Tie the ends tight.
Don’t have elastic? Use hair ties or elastic head bands. If you only have string, you can make the ties longer and tie the mask behind your head.
Don’t have elastic? Use hair ties or elastic head bands. If you only have string, you can make the ties longer and tie the mask behind your head.
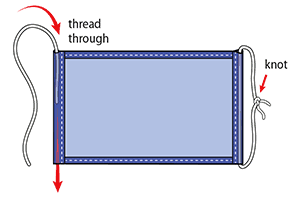
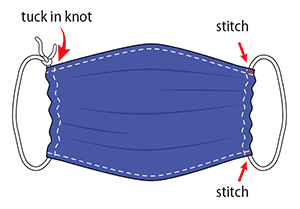
4. Gently pull on the elastic so that the knots are tucked inside the hem. Gather the sides of the mask on the elastic and adjust so the mask fits your face. Then securely stitch the elastic in place to keep it from slipping.
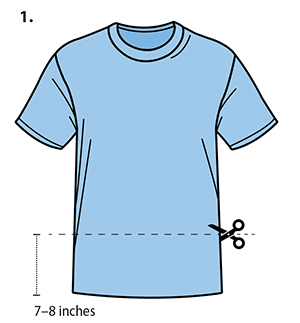
Quick Cut T-shirt Face Covering (no sew method)
Materials
- T-shirt
- Scissors
Tutorial
Bandanna Face Mask Tutorial


Photos courtesy of social media especially Facebook. When I knew the maker I gave credit but all are wonderful!


Most of us use the same fabric front and back. However, nurses are now beginning to request two different fabrics. One for the front one for the inside.
Hospital or nursing home care givers who wear a mask all day long need to be able to tell which side they had out (and therefore germ ridden even by their hands putting them on if they need to take their mask off to eat, drink or whatever during the day! And which side is still clean to go against their faces.
If you can using two different fabrics really helps them to know which side they wore outside and which touched their face each day.
We can't and mustn't feel badly about donating ones early on that are now known to be problematic. We all do the very best we can and when we learn things that are better we are then able to do better!


Here is a potential idea:
A neckroll/headband for a nurse to put buttons above ears to attach the mask too as elastic often hurts!


Here is a potential idea:


Button Headband Tutorial - For Masks (COVID 19) - YouTube
Sewing a button to a headband to keep masks from breaking the ears - pics below


Note:


No elastic?
So many other options wee shown from stretchy lace from the $ store on. I assume before isolation or at lunchtime of an essential job . If you have panty hose around use those.
Even the 3M surgical mask performed better with stockings in their study:
Testing showed that it went from blocking out 75% of small particles to 90% with the addition of a pantyhose overlayer.
By comparison, an N95 respirator, which is designed to create a tight seal around the face when worn properly.
The big use of pony tail elastic rounds? ONLY IF THEY ARE LARGE MEANING LONG AND NOT THICK! Otherwise your ears won't be able to stand the pulling forward for very long. Any kind of elastic ends up hurting eventually. Any kind!!! The best would be unseamed cuts of 1" to 1.5" of stretchy material of any kind even if you cut up old t shirts!

In fact in a real pinch, t-shirt fabric or cut up t-shirts make pretty good masks. The knit is fairly tight and after washing shrinks even closer together!!!

So, no cotton...cut up an old shirt. No old shirts you only wear t-shirts? Cut up the t-shirt!!! Can't cut or sew? Pull it over head and fashion a face mask as a dire solutions in a pinch!
Better than nothing! My own husband who has access to a number of mask choices mows our field while wearing a bandanna instead!
Easy Ties from a T-shirt!
Fold Tshirt in half lengthwise and cut 1" strips across. Pull each tie tightly and it will naturally curl into a nice rounded curl! Cut to size as needed.


Mask Liners for added protection:
Update as of 4/23/2020


Update as of 4/23/2020
As of today, most liners in our homemade face masks/coverings are being shown to be problematic. Grateful for good instincts, none of the ones i gave away used a liner of any kind. The ones i gave fsmily were simply mask coverings as any of us visiting loved ones in 3 cities had been at least provided with a complimentary "surgical masks" from December on and before COVID-19 and shortages. I saved mine from 2010 on so had 6 from 6 different hospitals in 3 different states
As an art quilter i save everything!

However! According to National Public Radio:
Cloth Face Masks Could Get A Boost From A Nylon Stocking Layer, Study Finds : Goats and Soda : NPR


"Researchers at Northeastern University have found that adding an outer layer made from nylon stockings to a homemade face covering can boost its ability to filter out small particles in the air by creating a tighter seal between the mask and the wearer's face.
In some cases, that extra nylon layer helped homemade cloth masks match or exceed the filtering capability of medical-grade surgical masks."
In some cases, that extra nylon layer helped homemade cloth masks match or exceed the filtering capability of medical-grade surgical masks."
Previous info on what most used:
To create a removable liner opening or "pocket" in your mask you need a have an openingin yourmask.
The very best is any kind of polypropylene. Think of those paper-fabric hospital masks or the complimentary reusable shopping bags that don't quite feel like fabric but are washable as well as sturdy.
That paper-fabric is almost impervious to microscopic viral particles! Strange but awesome stuff!
Commercially available polypropylene is under various names but one is "Olyfun". Next to impossible to find now of course!
If you have bags made of this, you can sacrifice them for the good of this cause of course! Cut them up and use any bit that's big enough!


This one has most of my favorite features.
1. Can be used as a hospital workers mask cover mask.
Many nurses are reporting they wear two masks if they have them hoping to keep their inside N95 or surgical mask clean underneath a overing mask and this one is big enough to cover one.
2. It uses a continuous tie system. More secure and well fitting and puts far less pressure on aching and tender ears after wearing a mask day after day much less week after week after week
Only thing i would change would be to add a full even potentially reversible lining with a filter pocket in the back center.
I love the nose fits so well for security and safety and fit.
This has the filter pocket, the shaped nose.
DIY Mask : How To Make a Mask with a Replaceable Filter (Free Pattern) Ver.1 - Sewing Therapy - YouTube (over N95)
https://www.youtube.com/watch?v=q2B7Twkh2SI
A very nice Community Mask Making project!
Pdf download below
https://psjh.blob.core.windows.net/covid/Instructions%20Community%20Mask.pdf
Face Masks for Covid-19 Relief
Includes the Blue Shop Paper Towel mask that actually works and can be made in minutes...if have the tough, slightly stretching blue towels from an automotive/hardware/big box store
https://www.asgmag.com/features/covid-19-how-to-make-your-own-mask/
Insrructables: Nurses for Nurses Mask
https://www.instructables.com/id/AB-Mask-for-a-Nurse-by-a-Nurse/

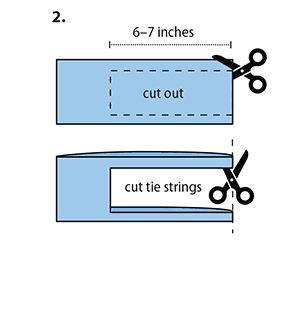
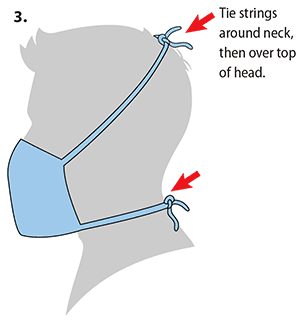
Making a Child's Mask with ties
(Enlarge to see my text for cutting size)

And this one actually just repeats links to two of my favorites But has some printable pattern pieces. Mine did NOT print to size, however. Not even when using the pdf version as they said was better. You can still trace a pattern off your computer screen setting it to extra bright first. Then measure the pattern on screen to make sure the mask bottom measures 6". Tricky!

https://indivisibleventura.org/2020/03/23/mon-3-23-its-time-to-do-m ore/
And i love others and you may too!
Either at the top or as above with a lapped envelope style in the back piece lining meaning it has to be cut an inch or 1.5" larger than the front for those two edges to be turned under, ironed and topstitched but only for the envelope style in center!
If it's at the top of your mask the filter liner can't be put in and then out for washing or replacing! And the mask is easily reversible.
If its in the back center you'll just have a but of a potential opening for viral access but with a liner inside still a nice barrier in there!
What to use for a filter?


The very best is any kind of polypropylene. Think of those paper-fabric hospital masks or the complimentary reusable shopping bags that don't quite feel like fabric but are washable as well as sturdy.
That paper-fabric is almost impervious to microscopic viral particles! Strange but awesome stuff!
Commercially available polypropylene is under various names but one is "Olyfun". Next to impossible to find now of course!
If you have bags made of this, you can sacrifice them for the good of this cause of course! Cut them up and use any bit that's big enough!
The best washable commercially available one that easiest to find is interfacing. Any kind of soft interfacing (only not iron on or you will permanently be ironing it in!)
Second would be another piece of cotton. Batik is highest rated cotton fabric for both mask and when also used as a filter because its thread count of weave being tighter, is more likely to keep tiny microscopic particles of the COVID-19 out!
But any cotton, any piece of flannel would help. Also if you're using a bandanna and can sew or hand sew a liner in!
A bandanna is better than nothing because it protects your sneezes and coughs from others. A mask when well made, fitted as snugly over nose and around cheeks on down is next most important for any mask of any kind. Hard for a bandanna to do this part but tie as tightly as you can to at least get a tight fit as it hand downward!
Based on testing and the difficulties breathing through such a thick filter and 2 pieces of fabric researchers said
"NEVER USE A PIECE OF VACUUM CLEANER BAG AS A LINER" If you have health issues you may find it very challenging to breathe through!
A Doctor Explains How to Make the Safest Face Mask - YouTube
It's not necessarily the safest but i love his enthusiasm for his wife's video demonstration on taking a hepa vacuum cleaner bag, very very carefully cutting apart each tiny top corner of the bag then laying her template pattern down along all the outsidr incorporated ssen already seems to incorporate them into the top of each of the 4 masks you can then cut out and sew.
You'd have 4 techno looking duck- billed hepa masks. Dr. Husband says he could breathe in it just fine. I think the big duck bill sticking out is the crucial key.
A Doctor Explains How to Make the Safest Face Mask - YouTube
if you just use a different "duck billed" mask pattern many claim they worked fine even.
So, have a hepa filter try these duck bill or bag styles. not the closing fitting directly on your face style!
I even previously suggested hepa filters for close fitting masks then had to correct myself! We are just doing our best and someone will truly appreciate each and every style just in different ways!
Tests showed that you cannot safely breathe through them for other than a short period of time. Not to work in!
And strangely enough for a non-washable liner that is still rated the very highest right along with polypropyleneor even (comin up!) Blue Shop Towels or Nylon Hosiery (aka sheer pantyhose
Believe it or not a BLUE SHOP TOWEL. (the kind found in automotive and hardware Stores) is a highly rated particle pass through resistant liner. Far more effective than any regular paper towel!
There are a number of brands sold. The one sold at Costco (Scott) rated 3rd but its still quite effective. You just have to make it removable and include extra liners if you give it to anyone. And they're hard to find just like most paper products.
So soft non-woven interfacing for washable liners or these Blue Shop Towels that if you have a garage or shop just might be found in there as another highly rated product.
Otherwise, another piece of tightly woven fabric. Note: batiks are better than regular cotton if you or can find have scraps of that. Otherwise only a notch above regular cotton which is fine.
Featured:
My Elvis Mask gifted to Instacart and Fred Meyer pickup and delivery workers and friends like my cute model below. She loves Elvis Elvis therefore loved her gifted mask!

Other ideas and styles:
Fitted masks by Mary Storey
Pattern here:
Making a A Face Mask for a Child:

DIY How to make a fabric face mask | Child mask | Easy mask for kids #fabricmask #mask - YouTube
Cut 2 mask pieces each 5"x 5"
( + 1 more for liner inside)
Cut 2 pieces of elastic each 6" long
Sew wrong sides together leaving opening to turn.
Add 1 elastic loop to each side.
Turn rights sides out.
Make pleats.
Sew down pleats
No Sew Masks in a Hurry


DIY No Sew Face Mask Easy and Quick for Anyone - YouTube
The Last Minute What Can I Possibly
Wear? Mask: A Bra

My Friend Anonymous
From the American Survival Guide:

Here is the bizarrely wonderful blue shop towel in action!
Because if you have these towels and you have a paperclip, two rubberbands and a stapler you can not only make a totally use-able mask but one that is pretty amazingly viable as far as how well it works.
IF YOU WEAR IT WELL FITTED BY ADJUSTING ITS ACCORDION STYLE PLEATS!
For any and all mask making:
Comfort and wear-ability first and safety second.
If you can't breathe then how well is should work or how well it fits won't matter because you'd be ripping it off in a hurry!
Adding an Opening for Inserted Liners:


COVID-19: How To Make Your Own Mask - American Survival Guide


My Favorite Patterns:


This one has most of my favorite features.
1. Can be used as a hospital workers mask cover mask.
Many nurses are reporting they wear two masks if they have them hoping to keep their inside N95 or surgical mask clean underneath a overing mask and this one is big enough to cover one.
2. It uses a continuous tie system. More secure and well fitting and puts far less pressure on aching and tender ears after wearing a mask day after day much less week after week after week
Only thing i would change would be to add a full even potentially reversible lining with a filter pocket in the back center.
I love the nose fits so well for security and safety and fit.
This has the filter pocket, the shaped nose.
DIY Mask : How To Make a Mask with a Replaceable Filter (Free Pattern) Ver.1 - Sewing Therapy - YouTube (over N95)
https://www.youtube.com/watch?v=q2B7Twkh2SI
A very nice Community Mask Making project!
Pdf download below
https://psjh.blob.core.windows.net/covid/Instructions%20Community%20Mask.pdf
Face Masks for Covid-19 Relief
Includes the Blue Shop Paper Towel mask that actually works and can be made in minutes...if have the tough, slightly stretching blue towels from an automotive/hardware/big box store
https://www.asgmag.com/features/covid-19-how-to-make-your-own-mask/
Insrructables: Nurses for Nurses Mask
https://www.instructables.com/id/AB-Mask-for-a-Nurse-by-a-Nurse/
Making a A Face Mask for a Child:
DIY How to make a fabric face mask | Child mask | Easy mask for kids #fabricmask #mask - YouTube
Cut 2 mask pieces each 5"x 5"
( + 1 more for liner inside)
Cut 2 pieces of elastic each 6" long
Sew wrong sides together leaving opening to turn.
Add 1 elastic loop to each side.
Turn rights sides out.
Make pleats.
Sew down pleats
Making a Child's Mask with ties
(Enlarge to see my text for cutting size)

And this one actually just repeats links to two of my favorites But has some printable pattern pieces. Mine did NOT print to size, however. Not even when using the pdf version as they said was better. You can still trace a pattern off your computer screen setting it to extra bright first. Then measure the pattern on screen to make sure the mask bottom measures 6". Tricky!

https://indivisibleventura.org/2020/03/23/mon-3-23-its-time-to-do-m ore/
And i love others and you may too!
Michele Bilyeu Creates With Heart and Hands as she shares her imaginative, magical, and healing journey from Alaska to Oregon. Creating, designing, sewing, quilting, and wildcrafting... from my heart and with my hands.