

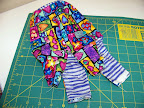
I love bags of all kinds and I am always making (as well as using) them! So, when I first spotted a tiny knot bag for sale in an expensive boutique, I knew I had to create my own pattern and figure out the directions and share them!
I was told that they are called 'Japanese Knot Bags.' But by using fabrics of any style, you can most certainly change the look and the purpose of the bag and truly make something unique and individualistically creative!
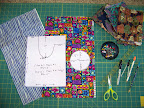

Supplies needed:
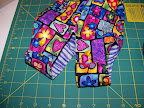
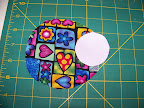
It is such fun selecting an assortment of co-ordinating fabrics, and a wonderful opportunity to use small pieces leftover from fat quarters for trim or the lining sections. I choose a whimsical print with a simple stripe as the lining and trim choices. One fat quarter of each is more than enough to make a small bag. You will also need scissors or rotary cutter and mat, pins and a pencil compass or piece of string tied to a pencil ;) to substitute for creating a round bottom section and a yo-yo circle for trim, if desired.
Creating Template Patterns:
For my tiny bag, I used an 81/2" x 11" piece of paper to create my original pattern. The bottom section was a 4" diameter circle. This makes a tiny bag suitable for a small child or a tiny gift item like a necklace, earrings or trick or treat or valentine's gift. To make a larger one, just proportionately increase the measurements and make it pleasing to both the eye and intended purpose!

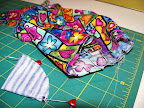
1. Sewing bag body sections together; repeat for the lining sections:
Like with any pattern, the body and lining patterns are simply mirror reversed sections. Because of the 'knot' or pulling one handle through the other style of closure, one handle must be longer than the other. The longer handle section will pull through the shorter one when closing. The circular bottom, or base of the bag must proportionately be able to fit the easing (as you seam it at the bottom) but since you can ease with a gathering technique, variations are easily substituted...from very gathered, to not at all.
Sewing bag and bag lining sections:
1.Seam lining sections, right sides together, leaving handles open at the top. Also sew the bag sections 1 and 2, right sides together, leaving their handles ends open.


2. Sewing Bottom Section:
Pin round circle bag bottom along the bottom edges of each of the bag pieces...the main sections and the lining sections. Gather, as needed, with either machine gathering stitches,hand ones, or just using the pins for ease. Sew seams, bottom to main sections of each piece.

3. Sewing Handle Sections of the bag and its lining:
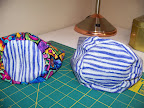
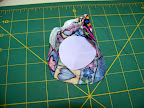
Stitch inner handle curves and outer handle curves. You continue to leave the flat, short end sections open and do not sew them at this time. Turning the bag inside out is done through an open handle section. This looks and feels very strange and awkward, but it truly works. If you've ever sewn a vest and left a side seam open, maneuvering the pieces inside and then out is very similar. You will feel like you are making a mistake, stay focused and pull all of the bag all the way through one single opening...it actually does work! Once it is all turned right side out, it looks like the third photo above.

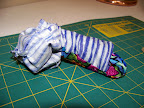
4. Finish Strap Ends and Topstitch the handle sections all the way around:
To connect the open strap ends into handles, I simple turned under the raw edges of each handle section, and then topstitched one short handle end over its partner to connect and then, one long handle end to its partner, to connect. I finished by topstitching all the way around the handle sections... both inside curve and outside curves.This is not only for decorative effect, though it creates a very nice one...it is to hold the sections properly in place, as well. (I added a colorful button to each overlapped handle section, which also matched the decorative button effect on the bottom of the bag, which is described below.)

6. Adding decorative elements:
I decided to add a decorative element by creating a simple stuffed 'yoyo' for the bottom. Not only cute, it also acts as a bag rest while the bag is set down on a surface. A yoyo is a small circlet of fabric, (see above sizing for proportions) gathered around a simple paper or cardboard template (smaller than itself, in size)
You sew it off with a knot after pulling the thread to gather, then remove the paper template. I added a button to the cuteness factor ;) which co-ordinated with the decorative handle buttons.


TaDa! A finished bag!
My tutorial link to save or post on your blog: Japanese Knot Bag Tutorial
A different, simpler pattern with print out pattern free download from American Patchwork & Quilting Magazine.
Please note:
While photos are interchangeably used for bag and lining sections, while experimenting with them, I decided that I really like the look of bag lining as bottom exterior section and made mine with that emphasis. You can do whatever you like and probably think of lots of other cute extras! Please send photos if you do, and I'll include them in my blog with your name and blog address for credit!
10 comments:
very pretty
Thanks for the tutorial. If I can every find some time...
Its a great bag, thankyou for the how to make them,
Take care,
You have been so busy since i last visited you,
Hi Michele,
They have a beautiful blog . It is simply marvellously which it makes.
Thanks for the tutorial. I will also try this bag to sew .They have a beautiful blog.
If it is quite would take I her on in my blog cunning.
Mariah
Note to my readers. Mariah is from Hungary. It is amazing that she even attempted to write in English. I went to her blog first, and barely had a clue on how to leave a comment. Suddenly, I did not know which side 'preview' was and which side 'publish' was and if it told me it was published or not. Now, I understand how tricky translations and not knowing a single word in their language is. I am so proud of anyone who even tries to comment in a foreign tongue and my heart was so deeply touched that Mariah tried!!! Please check out her blog by clicking on her name and going to Mariah to see her lovely stitcheries! Blony is from China and her blog is not up just yet but how nice she stopped by, as well!
I made a very similar bag yesterday. I wish I had used your pattern instead, I like the round bottom.
Thank you! You helped me and i blogged you!
Corrie
http://cocojdesigns.blogspot.com/
Thanks for the tute, esp. the measurements. I made a few of these last year using a pattern on a different site, but when I went back to re-print the pattern (because someone helped it disappear, happens when you have kids!), it was gone, as if it had never existed. Highly annoyed, I clicked on your blog, and voila! a very, very similar pattern. Thanks so much!
How did you know I was looking for a bag pattern that was different?!? This is perfect and I will be starting one tomorrow! I like your pattern and tutorial much better that the one at American Patchwork. Thank you, thank you!
Gracias, me encanta. Voy ha intentar ponerme hacerlo, para mi y para mis hijas. Gracias de nuevo por el tutorial.
Post a Comment