Creating a Cross Quilt:
As part of a online quilters' challenge to help lift the spirits of another quilter, I have created a simple tutorial on designing your own liberated, wonky, modern...or for Mary Lou Weidman....."Hoochy Mama"..."Liberated Cross" quilt block tutorial.
Mary Lou Weidman is a beautiful and vivacious woman, a talented artist, and quilter in all ways. And now, we all have been supporting Mary in online quilting groups after her very recent diagnosis of breast cancer. She expressed interest in 'Cross Quilts' especially the artsy, wonky ones and asked if any of us knew how they were made as she could see it involved simple slashing here and there.
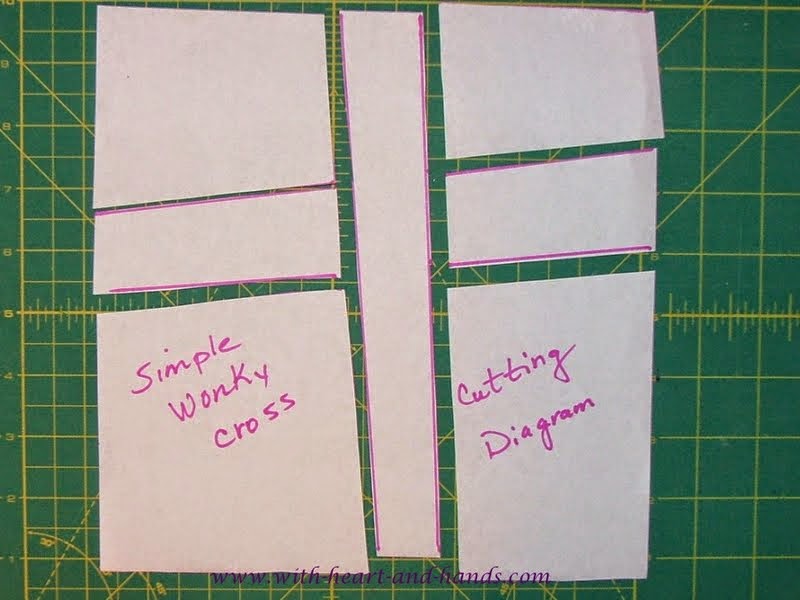
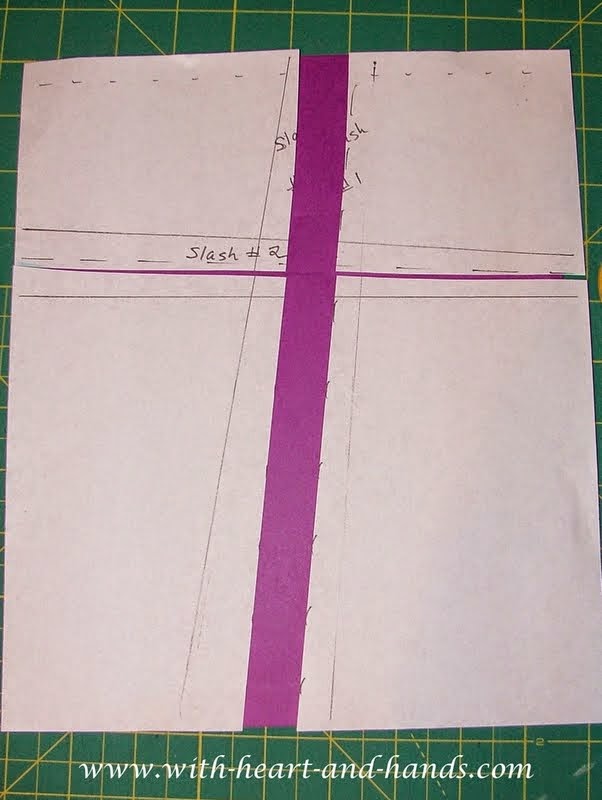
I quickly drew her a super simple basic block pattern and it has led to my offering to post the rest of that process here. And you'll notice my dyslexia showing in the drawing above. That solid cross bar is supposed to be horizontal! Make you wonder how in the world I do all of the things that I do, doesn't it? Yep. Me too.
Because our blocks would be individualized and wonky, with varying sized crosses, no sizing can work for all. So, I had suggested about the size of a piece of paper to start your block or a 12" block and turn it into a rectangle after the fact. Seriously.
My hope was that quilters would volunteer to make Mary Lou a Liberated Cross Block or two in her favorite bright colors of red (shades of red to create the background), cheddar, lime green and purple. And then throw in some pinks, and lavenders,and some pale and gentling neutrals so we can get variety and value and all the rest of that good stuff. And then I would pull them all together and create the quilt!
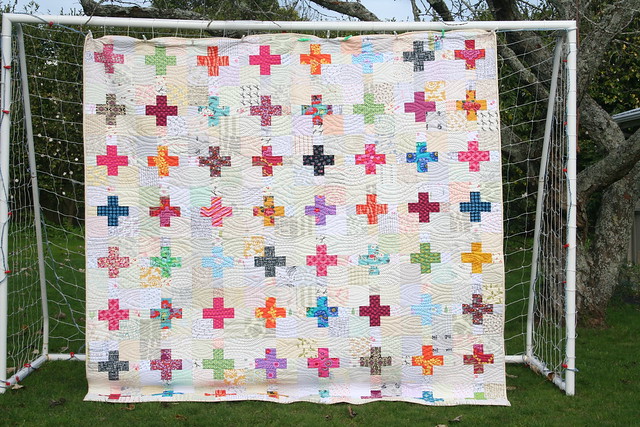
And what in the end, 122 blocks were donated by 32 quilters from the USA and Canada. And I pieced and created this quilt!

122 Cross Blocks
Created out of friendship, love, and gratitude,
Created out of friendship, love, and gratitude,
For Mary Lou Weidman
From 32 quilters
across the USA and Canada

Healing Comfort Quilt: 75 blocks


Pillowcase Styled Quit Case: 32 blocks, 16 per side

Pieced and
quilted by Michele Savikko Bilyeu
Salem, Oregon
April 2015
Front:
70 Pieced Cross Blocks

Back:
Timeless Treasures: "Quest for a Cure" and "Faith" fabrics
+
5 Additional and very dear Cross Blocks to match!
+
5 Additional and very dear Cross Blocks to match!

Any and all small remaining blocks will be made into a Prayer Flag for the People of Nepal,
With our thoughts for our mutual friend Andrea Balosky (Nyima Lhamo of Nepal) and all of her friends, family, and country people of Nepal and its surrounding areas.
And if you can't see your block, trust me some of yours is in there somewhere. I couldn't quite get 122 into the quilt but I did my best doing what I did and no block goes unloved and used for this cause!!Many are in the pillowcase sham..two sides, and others are going into the prayer flag garland!!!

My thanks to the wonderful and loving quilters across the USA and Canada, who donated their beautiful cross blocks and made this quilt possible. Thank you to those who donated fabric, scraps, and money for batting and thread. And many thanks to Yvonne Porcella, who told me to cut the blocks and the quilt size down or it would be too heavy! And to Mary Lou, herself, for all of her support, her advice and her help..and yes!..Mary Lou made some of the blocks, herself! She knew fun when she saw it! And she shared the process with her quilting groups as she worked her way through California on the way back home to Spokane and her earthly treatments. Bless you, Mary Lou!

I dearly loved making this quilt and am grateful to have been able to do so. I managed to listen to everyone's advice and kept it to the 'throw' or 'comfort quilt' size of 4' x 6'. It feels just right in all ways!
It is being mailed today to Mary Lou who is undergoing treatment for Breast Cancer, knowing that the healing power of love from the Divine through our hearts and our hands, will fill her to the brim and carry her through all that she needs to do to be healed in mind, body, and spirit, from the challenges of this disease.
We love you, Mary Lou!!!
Designing a Liberated Cross Block
First, I determined the logical progression for (1) drawing or using a pattern, (2) cutting those 'pattern' pieces out, and then, (3) sewing them back together again! These are the very basics of creating a quilt block....no matter what style of quilting you do, or type of quilter you are!But wonky quilters don't think like other quilters might. So, the progression is different, too. Basically, it is slash and sew as you go.
Cut and Sew in Quick Steps:
The Easy, Liberated Cut and Sew as You Go Method
Slash your background ) block vertically.
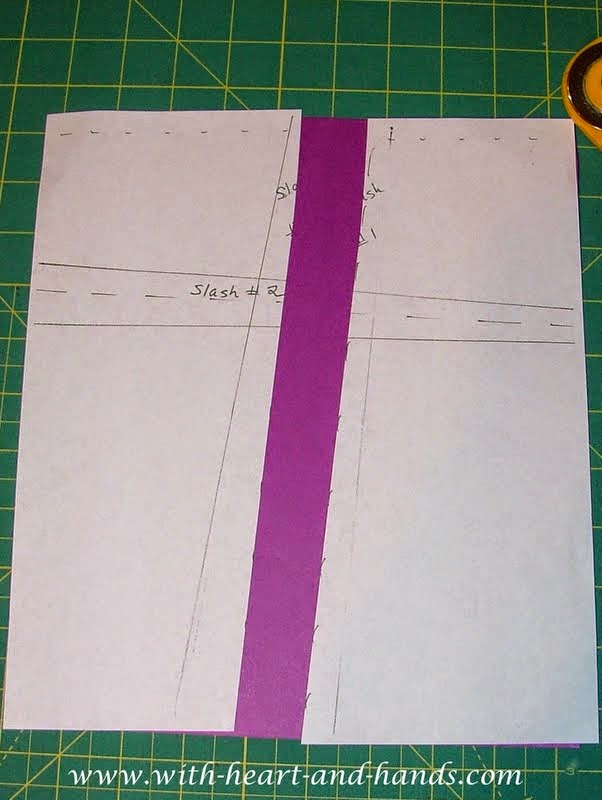
Insert your coordinating fabric and sewn it in on both sides.
Slash this unit, horizontally.

Insert your coordinating fabric and sew in horizontally.
Now,
our already liberated and wonky quilters, don't think about it, they
just do it. And trying to figure out what I think as I do has been a
circuitous process. I only got 1 hour and 45 minutes the night before
and had no brain much less logic. No sleep and no naps makes for one
wonky life!
But
having a lot of traditional quilter friends who need specific and
logically progressing patterns. I'm trying to supply that for all of
you! So, if you are rational and logical..yes, I mean you and you know
who you are...
And to give the additional option of having bars not quite meet in the center for an additonal wonky emphasis, as well!
And to give the additional option of having bars not quite meet in the center for an additonal wonky emphasis, as well!
The progression is Draw, Cut, and Sew!
1. Draw a cross bar..in any horizontally slanted direction or position of your choice.
2. Draw a connecting, but not crossing over, vertical bar to intersect it on both side of its middle.
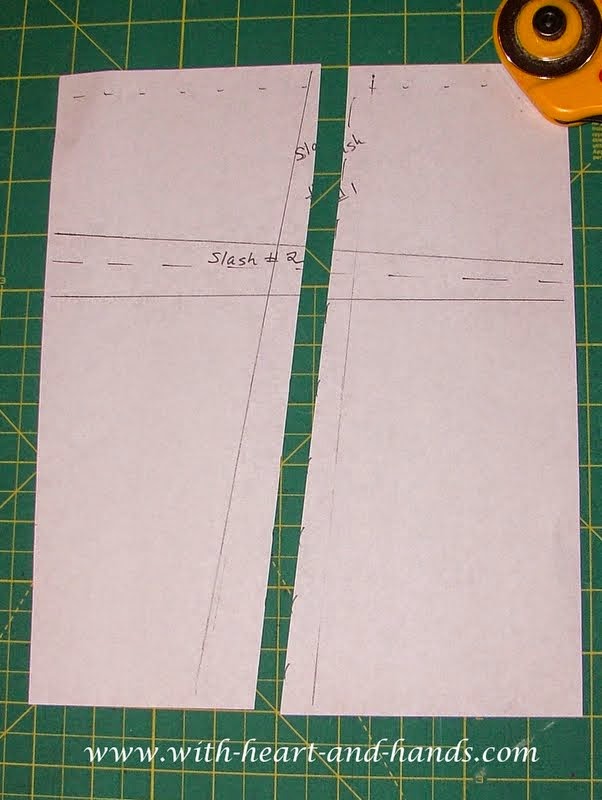
Cut and Sew in More Traditional Steps!
Version 2.To cut out your "pattern"(if you need one) in more the traditional way to create your block:
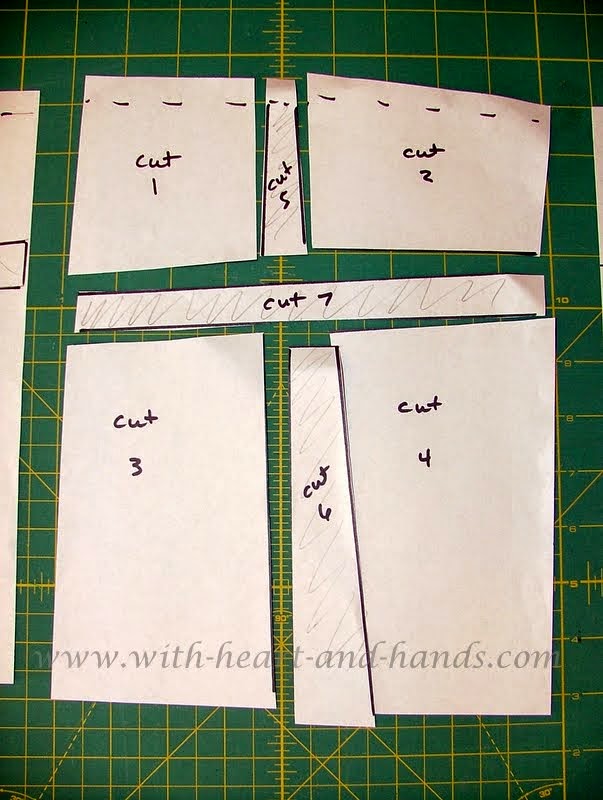
1.Cut out the sections, one by one. I have numbered mine in order to create a patterning style as this is how I work with my own spatial and dyslexic brain in order to process anything involving 'math' or 'directions' of any kind.
To sew your 'pattern' pieces together:
1. Sew your pieces together, one piece to another, I used the same clockwise progression, and then added in the horizontal cross bar last...which then anchors the middle and completes the block.
And there you go, you now have a Liberated Cross Block!
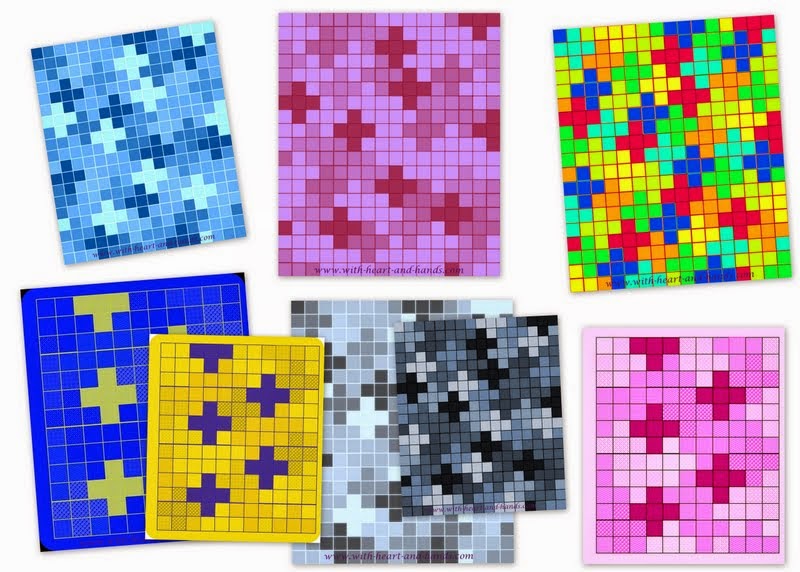
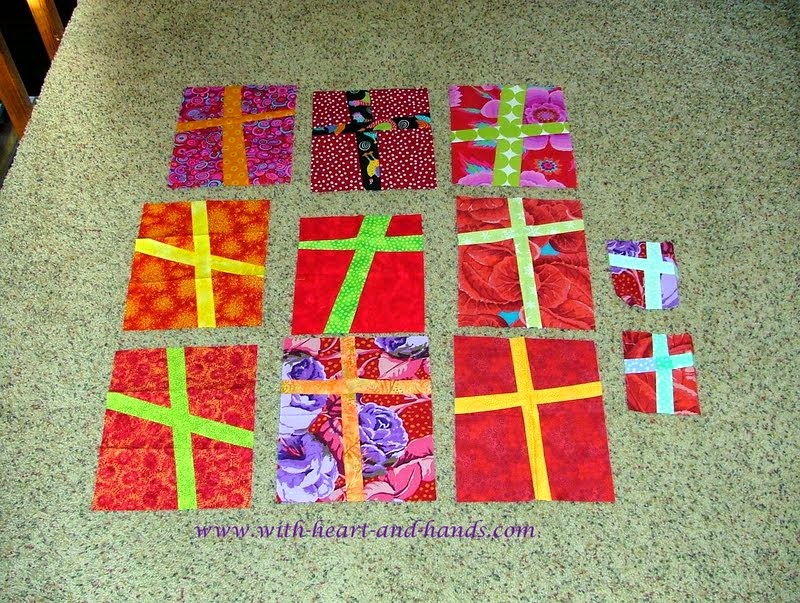
And just for fun, I then
created a variety of other variations of the liberated cross block
idea..to show how it might all play out! Just for seeing the flow!
And the blocks came in, here are a few 'real life' cross blocks in the liberated or wonky style to give you ideas!
Cross or Plus Quilts: Free Patterns
Designing a Liberated Cross Block and Quilt

.jpg)
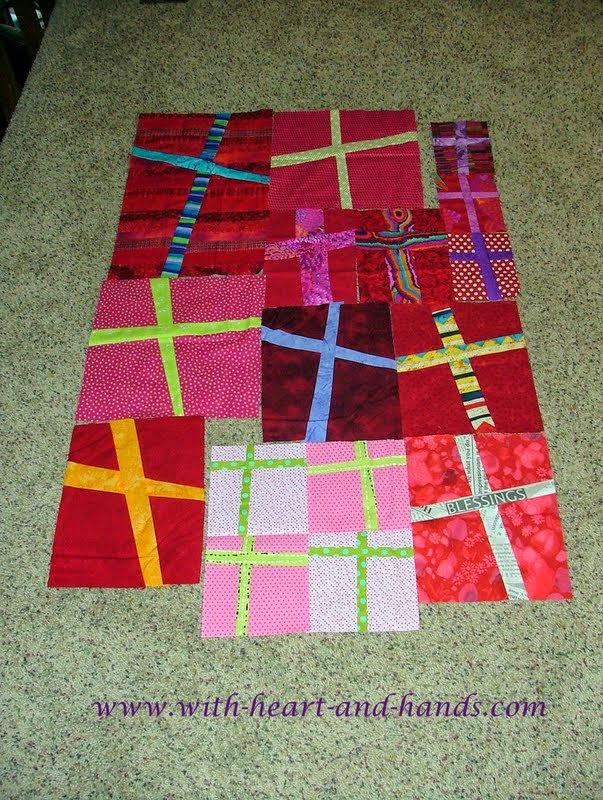
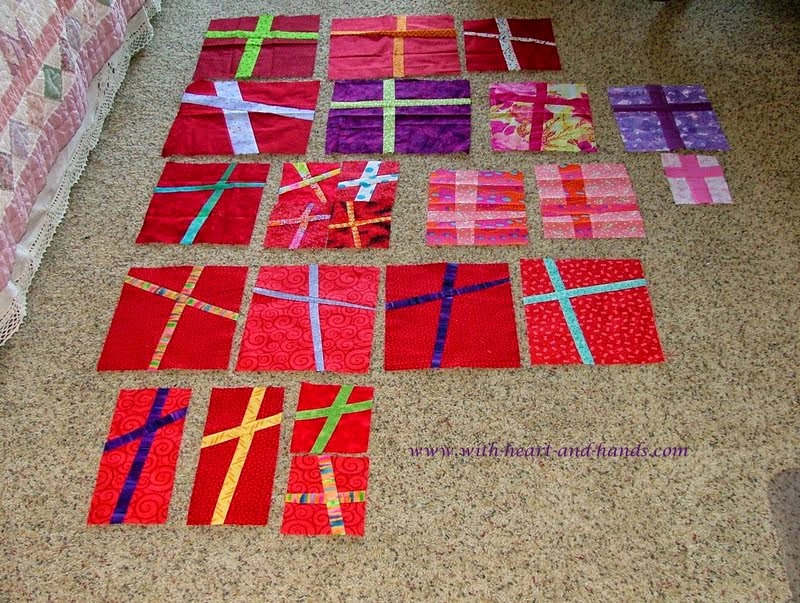


And the blocks came in, here are a few 'real life' cross blocks in the liberated or wonky style to give you ideas!
Cross or Plus Quilts: Free Patterns
Designing a Liberated Cross Block and Quilt
Making Mary Lou Weidman's Cross Quilt
also:
With Heart and Hands: Free Patterns for Prayer Quilts
+++++++++++++++++
A wonky square ..cross or plus...is this easy!

How about Skinny Crosses or Pluses if you're mathematically inclined?
So,
for cross, plus, or
mathematical quilts as any design may be called,I share a small one and a
medium sized one. This is what I consider a 'do able' easy version
just using the basic square and turning into larger units by the use of
color. Want something more challenging...go for the improv and you do
that on your own as that is the very definition of free piecing and
improv, quilters ;-)
But you can simply do the 'arithmetic' as I did by counting squares and make one any size you wish!


Color Selection and Value: See how differently one quilt can be depending on your own personal choices and selection of fabrics.

Materials:
20 fat quarters of the equivalent in scrap fabrics, your choices solids or prints, or combine both
2 yards of 90" wide batting
4 yards of backing fabric or pieced backings of choice
1/2 yard of binding fabric
Block #1: 72 pieces 4"x4" cut size (3.5" square finished)
Block #2: 27 pieces, 11"x4" cut size (10.5" x 3.5" finished)
Block #3: 6 pieces 7.5" x 4" cut size (7"x 4" finished)
Cutting:
From 20 fat quarters or the equivalent in scrap fabrics:
Cut (4) 4.5"x21" strips
Subcut each strip into (4) 4.5" squares for a grand total of 320 squares.
Layout:
You will need:
(48) - Full 5 square cross/pluses
(11) - 4 square parts
(2) - 3 square parts
(14) - Single squares


Materials:
15 different fabrics if you want real variety and subtle background tones or fewer if not.
Start with approximate scraps that are at least 4.5" strips of each to create blocks that will be cut at 4"x 4"
1/2 yard or 24 squares of dark
1/3 yard or 20 squares of
1/4 yard or 15 squares of a medium or bright
1/2 yard or 24 squares of a light
1/4 yard or 18 squares of another light
1/4 yard or 16 squares of a print
1/4 yard or 11 squares of a background neutral
1/4 yard or 14 squares of a second background neutral
12” of fabric for 2 1/4” cut binding
1 2/3 yards of fabric for backing
1. To cut the squares, align the selvedges of each fabric and cut a four-inch strip, then sub cut the strips into 4” squares.
2. Follow the diagram or quilt photo to layout your squares.


Note: All of these arithmetic, plus, or cross quilt patterns and tutorials are available for free, don't be fooled by going into a cart and paying for one.
Come here and I will almost always have what you need, if not..I will soon be adding it in!
A wonky square ..cross or plus...is this easy!

How easy it would then be to create a quilt from an assortment of wonky cross blocks!
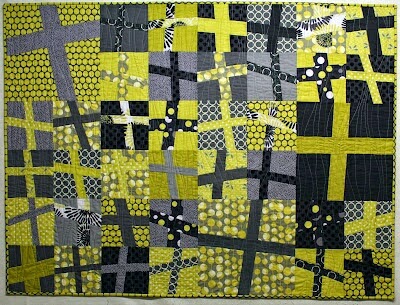
And now, we have an entire group..... modern and art quilters who are looking for more diverse arrangements with value and layouts and an entire generation of cross quilts have morphed into 'plus' quilts....some carefully pieced, others improvisationally created. So much fun, no matter what you choose to create!
Use my cutting diagram above but cross cut that solid vertical piece!
And now, we have an entire group..... modern and art quilters who are looking for more diverse arrangements with value and layouts and an entire generation of cross quilts have morphed into 'plus' quilts....some carefully pieced, others improvisationally created. So much fun, no matter what you choose to create!
How about Skinny Crosses or Pluses if you're mathematically inclined?
Here is how Ashley of Film in the Frig made hers
( with Windham Hill Fabric and pdf download of basic directions at
But you can simply do the 'arithmetic' as I did by counting squares and make one any size you wish!
Basics for Making a More Traditonal Cross, Plus, or "Arithmetic" Quilt:

Color Selection and Value: See how differently one quilt can be depending on your own personal choices and selection of fabrics.
This
layout is for a quilt that is about 54" x 75"when finished and larger
if you add borders. This is considered a nice lap, nap, or cot size.
20 fat quarters of the equivalent in scrap fabrics, your choices solids or prints, or combine both
2 yards of 90" wide batting
4 yards of backing fabric or pieced backings of choice
1/2 yard of binding fabric
Block #1: 72 pieces 4"x4" cut size (3.5" square finished)
Block #2: 27 pieces, 11"x4" cut size (10.5" x 3.5" finished)
Block #3: 6 pieces 7.5" x 4" cut size (7"x 4" finished)
Cutting:
From 20 fat quarters or the equivalent in scrap fabrics:
Cut (4) 4.5"x21" strips
Subcut each strip into (4) 4.5" squares for a grand total of 320 squares.
Layout:
19 rows of
16 square each

16 square each
You will need:
(48) - Full 5 square cross/pluses
(11) - 4 square parts
(2) - 3 square parts
(14) - Single squares
Smaller and simpler version:

Cross or Plus quilt finishes at 38" x 52"
Materials:
15 different fabrics if you want real variety and subtle background tones or fewer if not.
Start with approximate scraps that are at least 4.5" strips of each to create blocks that will be cut at 4"x 4"
1/2 yard or 24 squares of dark
1/3 yard or 20 squares of
1/4 yard or 15 squares of a medium or bright
1/2 yard or 24 squares of a light
1/4 yard or 18 squares of another light
1/4 yard or 16 squares of a print
1/4 yard or 11 squares of a background neutral
1/4 yard or 14 squares of a second background neutral
12” of fabric for 2 1/4” cut binding
1 2/3 yards of fabric for backing
1. To cut the squares, align the selvedges of each fabric and cut a four-inch strip, then sub cut the strips into 4” squares.
2. Follow the diagram or quilt photo to layout your squares.
Note:If you can't wing it from the above or want another option,
click on one of the pictured links below and go directly to others sites for tutorials!
Cross Quilt Tutorial by Sew Katie Did
PLUS QUILT
Note: All of these arithmetic, plus, or cross quilt patterns and tutorials are available for free, don't be fooled by going into a cart and paying for one.
Come here and I will almost always have what you need, if not..I will soon be adding it in!

Uneven nine patch and star quilt by Laura Boehnke at All People Quilt


Hot Pink Cross quilt tutorial at Betty Ninja


Happy Camper Wonky Cross Quilt with a free tutorial from Sew, Mama Sew!
And here are other quilts for inspiration!