Mar 29, 2012

Happy Dance Into April With the Alzheimer's Art Quilt Initiative


It's time for doing some dancing...and this isn't any April Fools!

I'm doing the happy dance for a wonderful April event.....the
Alzheimer's Art Quilt Initiative's April auction!

My quilt is #9125 - Change and Transition a
nd is filled with happy and bright colors of fun. But I have also filled it with my own energies of the joy of life and how I try to always see meaning in all of life's change and transition.

As my little quotation by the Greek philosopher, Herakilitos, says "There is nothing permanent except change.

It's that simple and that complicated. Really and truly, it's about how we see, and therefore how we deal with, the challenges of change in our own lives. It's easy to grump and groan, but why not see the truth in the dragonfly's wings...their very translucence and mirroring of color in the world around them is simply a reflection of all seems to be real in this world of illusion.

That which is true, and that which is real, can never be destroyed. For the soul aspect of our lives....all that we reflect, and all that we are part of....our true nature, and our true spirit, lives on.

Celebrate April and bring in some sunshine, and not just rain and tears this month! Join me in my own little Happy Dance and help me thank the Alzheimer's Art Quilt Initiative and all of the wonderful volunteers who seek to make a difference in the world..one little quilt at a time.

Remember!!!! All quilt sale profits go to fund Alzheimer's research!!!

Think about buying a little quilt for your own sewing room wall, a special place in the kitchen, hallway, or by your favorite chair in the family room. But they also make the best all occasion gifts for all of your favorite people any time of the year!
See all of the quilts for sale on our sale page at AAQI as well as view the lovely quilts in our auction. And please don't forget my entry. I would so dearly love it if it would go to a really, really good home....YOURS !

Michele Bilyeu

Salem, OR USA
Width: 9" Length: 12"
Designer: Original design
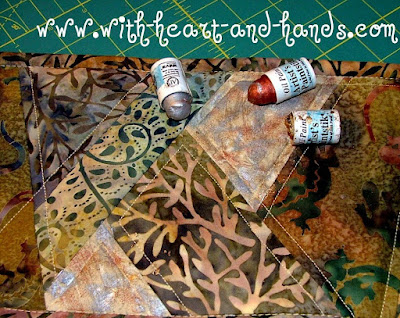
Materials/Techniques: Batik cotton fabrics, Shiva oil sticks, dryer sheets, colored inks, and raw edge appliqué. I create my own designs cutting directly from the fabric (without even sketching first) and let the theme tell me where and how to cut, piece, or embellish.
Artist Statement: The Greek philosopher, Heraclitus, once wrote, "Nothing is permanent except change.” I thought about the 15 members of my family that have been challenged by Alzheimer's disease, and all of the changes that have been created in all of our lives. I used the quote and the symbolic dragonfly imagery to represent the active power of seeing through illusion into recognition of the transition of all of life through the cycles of endless change.
Dedication: For anyone whose life has been forever and permanently changed by Alzheimer's disease or dementia.


Michele Bilyeu blogs With Heart and Hands as she shares a quilting journey through her life in Salem, Oregon and Douglas, Alaska. Sharing thousands of links to Free Quilt and Quilt Block Patterns and encouraging others to join in her Liberated Quilting Challenge for the Alzheimer's Art Quilt Initiative (AAQI) Help us change the world, one little quilt at a time!

Mar 24, 2012

Coloring Outside the Lines


"
I've never understood what seems to be the over-preoccupation with precision in the quilt world. It seems to me that the making of art has very little to do with staying inside the lines." Gwen Marston, quiltmaker

Here it is...getting closer to the end of March!!! In just one week, we had a 69º where we gardened in shirt sleeves, the next day we had a huge hail shower, then after that, we had an enormous wind gust that knocked over a 100" tree .....across our driveway, across our property and touching the fence of our side neighbors of our 2 1/2 acre property!

And then, with company coming to stay and visit with us (from Anchorage, Alaska..where they had 10' of snow and were trying to escape)........we had SNOW!

Snow on the second day of SPRING!!

Yep...nature is coloring outside of the lines....trying to get us to climb out of the boxes....and push out from the walls that we have all built around ourselves!

And if Mother Nature is trying so hard to crack the shell of life's patterning....

Why shouldn't we???

If you are like me, it's just too easy to get stuck in the day to day doings of life...and then of course, spend FAR too much time on the computer, or in the laundry room.....or trying to do a million things that someone ELSE wants me to do....and not enough time letting my inner child out......and just having fun with my inner artist!

Well, this week, I was lucky! Our visitors brought along a one year old. My precious little great-niece not only showed me that my house is a fun "free-for all" filled place (with the most interesting objects with infinite uses.....i.e. NOT child proofed) but that we could play with ordinary objects, use them, or decorate with them.....in many different kinds of ways...and still have a great deal of fun!

This beautiful little one year old spent half an hour just tossing my polished rocks and crystals from one container on my coffee table to another! And yes, I smartened up and substituted plastic kitchenware fun in a hurry but obviously not too big of a hurry ;) since I let her do it and observed her doing it. While I deliberately chose to 'let her do it', I was releasing constrictions in myself about what things are most important to me.... and how I act, and react accordingly.

I don't want to always be judging, and labeling, and restricting life ...I want to color outside of the lines! I want people to be more important than things, and relax (but not completely let go) of boundaries within my self.

It reminded me of my own need to break free from old patterns and restrictions......in everything I do, or make. To stop my inner judge from trying to tell me how to live, and allowing my one year old self to come out and enjoy life, as it is..and not how I think I need it to be!

Sometimes we forget that sewing and quilting are art forms...fabric and textile arts have been around for centuries... and the need to create runs deep within so many of us. But letting the creative juices flow, and being able to try new things, is always a bit of a challenge.

We tend to and want to, continue to do and make things in the same old ways .....and we substitute seeing the use of new patterns to try, or the latest fabric as being more creative. It is...and it isn't!

So, like a lot of others...especially those of us who seek to be 'liberated quilters' I am taking a look at what being liberated as a quilter means to me as an artist and not just someone who sews. And I am working on sensing the process of aligning my energies to get into the flow of creativity .....and just have fun with everything I do!

I promised myself to strive to be creative every day this year and encourage myself to try something new each day in that process! And I decided that once a week...I would 'make art.' Making art is like making magic...you just bring new creative energies into your life. So, each day, is an art day for me in that sense. Yesterday, we all made art from the ordinary, today I made art for a cause, tomorrow I may make art just for no reason.....except to make art and feel happy about that process.

No matter how tired we are, busy or stressed we feel, or how life's challenges or other people's expectations affect us....if we have just one thing to look forward to in a day....it's all worthwhile!

Think outside of the box, today...and be sure to color outside of all of the lines that you set for yourself that keep you from having fun !

Mar 20, 2012

Everyday Art: "Kitchen Quilts" and Magnets


I love to make everyday objects and I love to make them as pretty as I can. Sure, it may be easier to just buy simple things like potholders, hot pads or table mats, or even magnets for putting up all of the reminders or brag clippings on the frig....but how much more fun to try and create your own?

And it doesn't have to be as complicated as some of my other projects that I have shared in the past. It can be as easy and as simple as buying a kitchen towel and adding a trim to make it your own, or creating your own magnets out of fabric, or photos, and inexpensive craft accessories.


When I needed one extra gift for a number of family members, I found these simple dishtowels at Craft Warehouse on sale for 4/$10.

It takes almost no time at all to add a simple fabric band, with rickrack, or ribbons, or lace trim. But it only takes a bit more time to free form piece a simple border from scraps.....and add an artsy band to some of them, as well!

It's a wonderful way to use up small scraps from potholders etc. that I have made in the past and co-ordinate these gifts to those!


And for simple additional gifts, I decided to make my own magnets to add in with the kitchen towels and I added an inexpensive ($2.99) tart, or flan pan that. The pan can be used to hold the towels as well as to try out the little magnets...and boy, do they stick nicely to magnetic surfaces.....far better than a lot of store bought decorative magnets!


For the home made magnets, you need pieces of fabric, decorative papers or giftwrap, or my favorite..family photos. From the craft store you find those extra strong round magnets that are made for this purpose, along with flat, clear marbles sometimes used in vases but now, more often for creating your own magnets, like mine.

Cut a piece of fabric, paper, or photo roughly to the size of the magnet ( I leave a bit of overlap extra) Using a toothpick, place a drop of craft glue..I used Aleen's Craft Glue and it was inexpensive...and worked fine. Spread the drop of glue evenly over the flat back of the craft marble. Apply our piece of fabric or paper or photo. Press gently but don't soak your fabric or photo. Let dry for several hours.

Then put a drop of glue onto the back of the fabric or photo, spread gently to cover, and apply the magnet. Let it dry for another couple of hours. then trim the fabric or paper away to match the edges. The marbles are not perfectly round, so it much easier to do it this way then pre-cut and find your circle doesn't match up at all!


Easy, everyday items that are so much fun to make, even more fun to use...and they make quick, simple and fabulous gifts in a hurry!

EXTRA SPECIAL TIP:
Why not get out some of your own Easter fabrics and try some of your own ;) They make a wonderful holiday gift...for a friend, a family member..or hey, even your self!!!


Michele Bilyeu Quilts With Heart and HandsAs a lifelong volunteer, I offer links to over 2,500 free patterns for quilts, quilt blocks, crafts, clothing, sewing room accessories, and more. As a committed volunteer for the Alzheimer's Art Quilt Initiative (AAQI) I am always urging others to join in the Liberated Quilting Challenge...and buy or donate a quilt, today!! We are all changing the world...one little quilt at a time.

Mar 17, 2012

Free St.Patricks Day Quilt and Quilt Block Patterns


Kermit Says "The Luck 'O the Irish to You!" and offers to share my free St. Paddy's Day quilt or quilt block patterns with you!

Shown above, is a simple string quilt, pieced in a diagonal pattern with 'Kiss Me I'm Irish' and other fun shamrock fabrics. Remember, that any quilt block or pattern can be used for this holiday by the simple use of color and fabric patterns!

Kermit's Irish green eyes are smiling on the string quilt done in greens and holiday shamrock etc. fabrics, hope yours are too!


So cute, 4 little pieced hearts make a four leaf clover, one big clover per block, easy download makes this one a keeper!


Shamrock Wall Hanging


Vintage Shamrock Quilt Block Pattern...Kansas City Star 1932


Here are quilt patterns with an Irish theme to celebrate St. Patrick’s Day or Sharing Good Luck or  Irish Themes at: Q if for Quilt by Martha:

Vintage Shamrock Quilt Patterns


http://qisforquilter.com/2011/03/vintage-shamrock-quilt-patterns/


Sewedhooked.com shamrock quilt above: 5: paper pieced shamrocks make up quilt

Quilting Assistant : Free Pattern : Shamrock Block


Shown above: Shamrock Quilt Block from Straw.com


Aunt Mary's Double Irish Chain Quilt Block Make an eight inch paper pieced block.


Broken Irish Chain a 10" pieced quilt block pattern from Quilter's Cache.


Celtic Sunrise - a 12" paper pieced quilt block pattern from Quilter's Cache


Double Irish Chain - a 12" pieced quilt block pattern from SewQuilty.


Double Irish Chain Quilt classic block for a pillow, or lots for a quilt.


Four Leaf Clover - 10" applique quilt block pattern from CompuQuilt.


Happy St. Patrick’s Surprise » the free quilt 

A lovely pieced hearts create a shamrock! Green for the Catholics, Orange for the Protestants, and White for the hope for peace between them.

Irish Chain - an 18" pieced quilt block pattern from Quilter's Cache.


Irish Chain Quilt - a 54" x 66" pieced quilt pattern from EZQuilting


Irish Eyes - a 12" pieced quilt block pattern from AZPatch.


Irish Grandma Sue Boy Block from Quiltmaker.com


Latticed Irish Chain Block a 28" block from Quilter's Cache


Scrappy Pieced Shamrock Block...turn several shamrocks into a darling quilt!


Scrappy Irish Chain Quilt - a 68-3/4" x 84-1/2" pieced quilt pattern from McCall's Quilting.


Shamrock


Single Irish Chain Quilt for Baby - alt/ 4 1/2" fussy cut w. Irish Chain from About.com


St. Patrick's Day Quilt from Kim's Big Adventure


Traditional Irish Chain Quilt lovely traditional Irish chain Quilt pattern.


Trip To Ireland Quilt - a pieced quilt pattern from Simply Quilts.


Make a mug, water bottle,  or drinking glass wrap as a fun, easy and quick project or gift!

No measurements given as they would obviously vary and depend on your own mug, glass, or bottle! 

Simply tape a piece of paper around your cup and draw the curving naturally as you go pattern lines!


EXTRA TREAT:
Yellow Clover Vintage Quilt Block: Instructions


**Yellow Clover a block design first published by Nancy Cabot for the Chicago Tribune. According to Barbara Brackman's Encyclopedia of Pieced Quilt Patterns, Yellow Clover is one of hundreds of Cabot patterns sold by mail order during the 1930s. It is no longer available online, and the hyperlinks for photos have all been pulled off the website. But here are the directions that I still have:


Yellow Clover:
BLOCK SIZE: 10 1/2" square
MATERIALS
  • Dark print at least 5" x 10"
  • Medium print at least 10" square
  • Light print at least 16" square or one fat quarter
CUTTING
Dimensions include a 1/4" seam allowance
  • Cut 2: 5" squares, dark print
  • Cut 3: 5" squares, medium print
  • Cut 5: 5" squares, light print
  • Cut 4: 3 3/8" squares, light print, then cut them in quarters diagonally to yield 16 side triangles
  • Cut 7: 2" squares, light, then cut 2 of them in half diagonally to yield 4 corner triangles
DIRECTIONS
  • Draw diagonal lines from corner to corner on the wrong side of each 5" light print square. Draw horizontal and vertical lines through the centers.
  • Place a marked square on a 5" dark print square, right sides together. Sew 1/4" away from the diagonal lines on both sides. Make 2 using the dark squares and 3 using the medium ones.

  • Cut the squares on the drawn lines to yield 16 dark pieced squares and 24 medium pieced squares. Press the seam allowances open. Trim each pieced square to 2".
  • Sew a 2" light print square to a dark pieced square to make a rectangle unit. Make 4. Press the seam allowances open.

  • Lay out the square units, rectangle units, and the remaining 2" light print square. Sew them into rows and join the rows to complete the block center. Press the seam allowances in the direction indicated by the arrows. Set it aside.

  • Lay out 3 medium pieced squares and 2 side triangles. Join them to make a pieced strip, as shown. Make 4. Press the seam allowances open.

  • Lay out one medium pieced square and 2 side triangles. Join them to make a pieced strip. Make 4. Press the seam allowances open.

  • Sew a corner triangles to a pieced strip to make a corner unit, as shown. Make 4. Press the seam allowances toward the corner triangles.

  • Sew a corner unit to a pieced strip to make a large triangle. Make 4. Press the seam allowances toward the corner.

  • Sew 2 large triangles to opposite sides of the block center. Press the seam allowances toward the corners. Sew the remaining large triangles to the remaining sides and press to complete the block.


Michele Bilyeu blogs With Heart and Hands as she shares a quilting journey through her life in Salem, Oregon and Douglas, Alaska. Sharing thousands of links to Free Quilt and Quilt Block Patterns and encouraging others to join in the Liberated Quilting Challenge and make or donate small art quilts to the Alzheimer's Art Quilt Initiative (AAQI) Help us change the world, one little quilt at a time!


The Luck 'O the Irish to You!


Kermit's green Irish eyes are always smiling as we share our free St. Paddy's Day quilt or quilt block patterns with you!

Shown above is a simple string quilt, pieced in a diagonal pattern for some easy and whimsical fun. I love playing in the strings bin and have made several of these Irish string quilts. Remember, that any quilt block or pattern can be used for this holiday by the simple use of color, and fabric patterns!

Honor the land, the culture and the people who have worked and fought so hard to survive through turbulent times and great suffering. There is still so much joy to be shared as we all feel the vibrancy and energies of being green and finding our own pots of gold at the end of the rainbow.... and celebrate life, and living today!

I'm green if not Irish...so all of my string quilts are made from leftovers scraps and hand-me-downs from others. Such a good feeling to make something out of that which others might have thrown away! And yes, I've been known to fabric scraps dumpster dive at quilting groups and hit our guild's free cycle table every month! Free is the very best bargain of all!


Scrappy Pieced Shamrock Block...turn several shamrocks into a quilt...look how cute!


Scrappy Irish Chain Quilt - a 68-3/4" x 84-1/2" pieced quilt pattern from McCall's Quilting.


Shamrock

Single Irish Chain Quilt for Baby - alt/ 4 1/2" fussy cut w. Irish Chain from About.com


St. Patrick's Day Quilt from Kim's Big Adventure


Traditional Irish Chain Quilt lovely traditional Irish chain Quilt pattern.

New!free St. Patrick's quilt pattern - Moonlight Quilts pdf

So cute, 4 little pieced hearts make a four leaf clover, one big clover per block, easy download makes this one a keeper!


Aunt Mary's Double Irish Chain Quilt Block Make an eight inch paper pieced block.


Broken Irish Chain a 10" pieced quilt block pattern from Quilter's Cache.


Celtic Sunrise - a 12" paper pieced quilt block pattern from Quilter's Cache

Single Irish Chain Baby Quilt


Double Irish Chain - a 12" pieced quilt block pattern from SewQuilty.


Double Irish Chain Quilt classic block for a pillow, or lots for a quilt.


Four Leaf Clover - 10" applique quilt block pattern from CompuQuilt.


Happy St. Patrick’s Surprise » the free quilt pattern's pdf file...lovely pieced hearts create a shamrock! Green for the Catholics, Orange for the Protestants, and White for the hope for peace between them.

Celtic Interlocking Squares Quilt Block:

Irish Chain - from Sharon Hultgren of EZ Quilt


Irish Chain - an 18" pieced quilt block pattern from Quilter's Cache.


Irish Chain Quilt - a 54" x 66" pieced quilt pattern from EZQuilting


Irish Eyes - a 12" pieced quilt block pattern from AZPatch.


Irish Grandma Sue Boy Block from Quiltmaker.com


Latticed Irish Chain Block a 28" block from Quilter's Cache


Traditional Irish Chain quilt with some shamrock quilting!...same link as above


Trip To Ireland Quilt - a pieced quilt pattern from Simply Quilts.


Triple Irish (chain) Flower quilt pattern from Moda

Ireland Quilt by Laura Roberts for McCalls Quilting

More Shamrock ideas ...applique can be so easy and fun!
Paper pieced St. Patrick's Shamrock by Jennifer Ofenstein at Sew Hooked;
St. Patrick's Surprise quilt by Beth Lancaster at Moonlight Quilts.
St. Patrick’s Shamrock Banner at Totally Stitchin' by Babylock
Leprechaun's Hat Mini Quilt by Lyn Brown.

Celtic Knots, below, with quick, fusible bias tape. Check out ideas at Quilter's Fancy and Clover and the article How to Make Celtic Bias Tape Designs.

Hair of Neptune by Lies Bos-Varkevisser at Lies Bos Quilts.
Free Celtic Knot Patterns at Marcel's Kids Crafts;
Free Celtic Knot Cross at Ireland Fun.
Rectangular Celtic Knot and Celtic Knot in Square at Wikimedia Commons.

Also, shown below, is a beautiful pieced endless knot made by Brooke Johnsen at Pitter Putter Stitch; it is based on the free Interlocking Seasons Quilt Block Tutorial at The Parfait Cafe.


Irish Chain, Irish Plaid or Pinwheel Quilts shown earlier in my list and below:


Double Irish Chain, see the pattern by Penny Halgren at How To Quilt (and Irish Chain Video Tutorial

From McCalls Quilting.com...below:

Lucky Clover Lucky Clover Quilt Block


Fairies and Flower Petals FREE Fairies and Flower Petals quilt block pattern
Fairy Ring Block FREE Fairy Ring Quilt Block pattern
Irish Chain Irish Chain
from McCalls


Treasures from Ireland Treasures from Ireland Block


Single Irish Chain by Sharon Hultgren at Simplicity.
Green Pinwheels, free pattern by Cori Derksen and Myra Harder for All People Quilt

Irish Plaid, free block pattern by Marcia Hohn at Quilters Cache.

Image credits: All images are copyrighted by their owners. I use them only because I am linking to them. Please ask permission of the linking site and not me for Pinterest pins!

Complete information can be found at the designers' websites provided in the links given throughout this linking list.


Words to applique:" Kiss Me I'm Irish


**Yellow Clover a block design first published by Nancy Cabot for the Chicago Tribune. According to Barbara Brackman's Encyclopedia of Pieced Quilt Patterns, Yellow Clover is one of hundreds of Cabot patterns sold by mail order during the 1930s. It is no longer available online, and the hyperlinks for photos have all been pulled off the website. But here are the directions that I still have:

Yellow Clover:
BLOCK SIZE: 10 1/2" square
MATERIALS
  • Dark print at least 5" x 10"
  • Medium print at least 10" square
  • Light print at least 16" square or one fat quarter
CUTTING
Dimensions include a 1/4" seam allowance
  • Cut 2: 5" squares, dark print
  • Cut 3: 5" squares, medium print
  • Cut 5: 5" squares, light print
  • Cut 4: 3 3/8" squares, light print, then cut them in quarters diagonally to yield 16 side triangles
  • Cut 7: 2" squares, light, then cut 2 of them in half diagonally to yield 4 corner triangles
DIRECTIONS
  • Draw diagonal lines from corner to corner on the wrong side of each 5" light print square. Draw horizontal and vertical lines through the centers.
  • Place a marked square on a 5" dark print square, right sides together. Sew 1/4" away from the diagonal lines on both sides. Make 2 using the dark squares and 3 using the medium ones.

  • Cut the squares on the drawn lines to yield 16 dark pieced squares and 24 medium pieced squares. Press the seam allowances open. Trim each pieced square to 2".
  • Sew a 2" light print square to a dark pieced square to make a rectangle unit. Make 4. Press the seam allowances open.

  • Lay out the square units, rectangle units, and the remaining 2" light print square. Sew them into rows and join the rows to complete the block center. Press the seam allowances in the direction indicated by the arrows. Set it aside.

  • Lay out 3 medium pieced squares and 2 side triangles. Join them to make a pieced strip, as shown. Make 4. Press the seam allowances open.

  • Lay out one medium pieced square and 2 side triangles. Join them to make a pieced strip. Make 4. Press the seam allowances open.

  • Sew a corner triangles to a pieced strip to make a corner unit, as shown. Make 4. Press the seam allowances toward the corner triangles.

  • Sew a corner unit to a pieced strip to make a large triangle. Make 4. Press the seam allowances toward the corner.

  • Sew 2 large triangles to opposite sides of the block center. Press the seam allowances toward the corners. Sew the remaining large triangles to the remaining sides and press to complete the block.


QR Blog Code Michele Bilyeu blogs With Heart and Hands as she shares a quilting journey through her life in Salem, Oregon and Douglas, Alaska. Sharing thousands of links to Free Quilt and Quilt Block Patterns and encouraging others to join in the Liberated Quilting Challenge and make or donate small art quilts to the Alzheimer's Art Quilt Initiative (AAQI) Help us change the world, one little quilt at a time!