
A petal bag (also known as an origami bag) is the easiest and quickest gift bag you'll ever make. It requires the equivalent of two fat quarters of contrasting fabrics, about 18" of pretty ribbon and about 20 minutes of your time.
Deciding to make a re-usable gift bag for my M-I-L's Valentine present, I quickly located two fabrics from my stash, untangled a pretty ribbon and began!
Step 1:
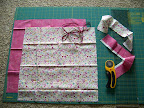
Cut out two squares of co-ordinating fabrics. Your bag can be as small or large as you wish. I used two fat quarters and made mine 18" x 18". You must decide ahead of time, which is the outer and which is the inner fabric. The petals seem to predominate to my eyes, so I choose my prettiest fabric to be the 'inside' and therefore also the petals!
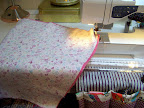

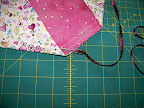
2. Pin two fabrics right sides together, marking a 'leave open here' space for turning right side out, later and stitch a 1/2" seam around the edges of the square.

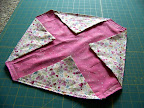
3. Turn right side out, lay flat, and fold over four corners of your square (mine measures 5" in to the point) This will form your 'petals' later.

4. Stitch around the outer edges of your project, near the edge to 1/4" in. This secures the petals and begins the formation of the ribbon casing.

5. Stitch another top-stitched seam another 5/8" from the first edge stitched seam. 5/8" will allow the passage of a bodkin (or just use a safety pin attached to your ribbon) for threading your ribbon through the newly formed casing.
6. This now creates a ribbon casing. Using the bodkin or a pinned to the ribbon, safety pin (I made a small knot for it to grasp on to, first) thread the ribbon through the casing, leaving long ends to pull and tighten and tie in a bow, later. You will be able to 'see' your ribbon at all four corners where the casing disappears. This is 'normal' and will not be so visible once the bag is tightened!
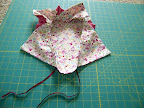
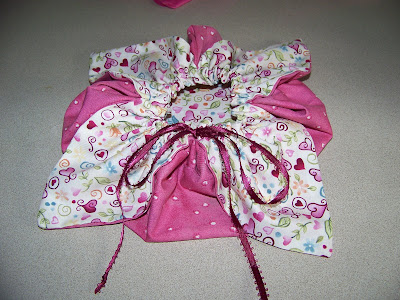
7. You petal bag will now look like this, partially tightened.
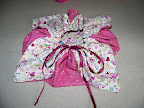
8. Cinch the ribbon up, tie it in a bow and Voila! ....a really cute, easy and re-usable gift bag!
note:
add extra decor items...a small strand of pearls, silk ribbons etc. for a fancier touch. I kept mine simple for easing of opening and speed of sewing ;) but for a decorative touch, these could all be added!
optional insert:
another another square at an additional quarter turn, sew in with a large 'X' and make jewelry pocket inserts!
12 comments:
Oh my goodness, this is so cute and so easy!! I think I'm going to have to do this for last-minute V-day gift mailing :) You should submit this tutorial to Sew Mama Sew for their fat quarter month!
try adding a smaller square made the same way but turned a quarter turn. Sew to the inside with an x thru the middle both ways. It then adds 4 little pouches to keep things separate and can keep small things untangled.
I have made several and love them
I don't remember the size, but got 2 from each fat quarter
Hi Michele, what a lovely way to make a gift wrapping. I love it! I have no need of one for Valentine's Day, but I sure will keep it in mind for other holidays.
Hope things are getting back to normal, whatever that is. Big hugs, Finn
I found this pattern in a Japanese sewing magazine and have made dozens of them. I make tiny ones using a 4 inch square and people use them for earrings while travelling. The Japanese use them as kimono bags (ie purses to carry while wearing their kimonos).
This is beautiful - what a great idea!
Really a nice bag -- love the touch of having petals!
I use a top stitch and decorative stitch to add a touch instead of beading
Made one in a craft class on cruise this year- they are so easy and look so good. Tutor also suggested making in voile/gauze with rough edges on outside to be distressed. This could then be a bag to hang oatmeal, herbs etc in the bath water or for soap storage in bathroom.
OH GOSH. I was googleing for a valentines bag to make as a quick gift and this is the most perfect idea...am so excited and cant wait to make it! thanks for your tutorial!
This should be quicker than the circle jewelry bag. Will try. Nonie
Thank's a lot !
Kisses from France,
Mireille
Thank's a lot !
Kisses from France,
Mireille
Post a Comment