Quillow: Etymological Note: quilt + pillow
Why make a quillow and not just a quilt?
With high school or college graduations quickly approaching, or for an unexpected birthday or even a great Christmas gift....what better gift to give from the heart than a quickly made 'quillow'?
A cross between a quilt and a pillow, it can be as simple as sewing two pieces of 45" x 72" fabric together and adding a pillow section of 18" -20" square......or as complicated as any scrap or quilt pattern pieced design you might choose for the quilt top and pillow portions. Reverse the pocket opening to the top, add straps and you have a wonderful baby quillow for a gift. You can even add extra outside pockets for baby supplies, and use it as a changing pad or play mat!
I was needing a quick gift for a great nephew who graduates from high school in a few weeks, and I was fortunate to have some scraps of soft flannel which a focus fabric featuring cars. Many of the designs in this fabric are vintage Mustangs, one of which this young man owns and drives as a cherished possession.

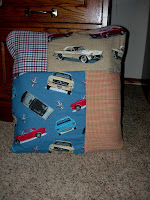
Using a 'Turning Twenty" pattern, I was able to quickly piece a basic quilt top and add a simply pieced back section and pieced pillow and in very little time, I was then ready to machine stitch in the ditch, flip and turn it into itself for the magic quillow.
Quillow Instructions and Tutorial:
For those of you, who have never had the opportunity to make a quillow, I am including my own version of instructions, and then directions on how to fold it back up into a pillow, again.
Please note:
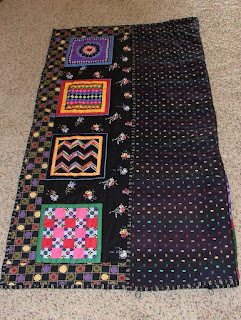
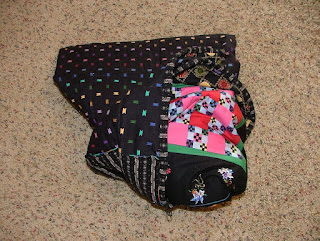
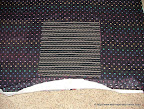
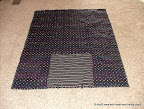
The appearing side of the pillow case on the back of the quilt will be the 'inside back' of the Pillow, itself by the very end of tucking in the quilt into the 'pillow' section.
So the 'right' side of the pillow is on the other side of this ivory section..inside the opening where you can't see it from this photo. As you turn it right side out it pops out to the pretty 'right' side!
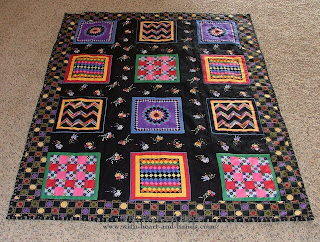
And the opening for folding and stuffing the 'quilt' inside that is at the very edge of the quilt here at the bottom of the quilt photo.
Leave this open! Do not sew it down in anyway as you attach the pillow section to the quilt body!
Basics:
Materials needed
4-5 yards total of assorted fabrics for piecing
or 2 yds. for quilt top and 2 yds. for quilt back
1/2 yd. for pillow pocket
thin batting of your choice ( a twin batt, 72" x 90" will make 2 quillows)
Step 1: Cutting Directions
For the "pillow pocket" cut as follows:
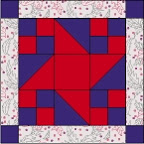
(1) 18 " to 20" fabric square or pieced square in color 1 for top
(1) 18 " to 20" fabric square or pieced square in color 2 for bottom
(1) 18 " to 20" fabric square of thin batting
For the "quilt" cut as follows:
(1) 45" x 72" piece (or pieced into blocks) of fabric for top of quilt
(1) 45" x 72" piece (or pieced into blocks) of fabric for back of quilt
(1) 45" x 72" piece of thin batting
*For a baby quillow, down size as desired, making pillow section 1/3 of total width of quilt
Step 2: Sewing the Pillow Pocket Together
Oh
1. Place batting on flat surface.
2. Place bottom fabric on batt, right side up.
3. Place top fabric piece on top of backing, right side down.
4. Pin together, stitch closed with 1/2", leaving an 8" opening.
5. Reaching into opening, pull out to turn pillow, shape corners and hand stitch opening closed.
6. Machine stitch a simple quilting pattern or hand tie to secure into a now flat pillow piece.
Step 3: Sewing the Quilt Body Together
1. Place batting on flat surface.
2. Place bottom fabric right side up on top of batting.
3. Place top fabric right side down on backing.
4. Pin, then sew closed with a 1/2" seam, leaving a 10" opening on one side.
5. Reaching into opening, pull right sides out, shape corners, hand stitch opening closed.
Step 4: Sew the Pillow Pocket to the Quilt Body
1. Lay quilt body, back side up.
2. Center the pillow pocket, flushed edges together, positioning at the center section of quilt,
wrong side of pillow pocket up, design nap pointing up towards outside edge. *pillow pocket final opening will be at the bottom of the pillow top, facing towards center of the quilt body as you look down at the backing.
3. Sew only three sides of pillow down flat to quilt body, leaving lower pillow edge open (facing the center of the quilt, not the outside of quilt edge) to form pocket.
4. Secure the quilt layers together by either hand tieing or machine quilting every 9" apart.
Step 5: Folding the Quilt into the Pillow:
1. Place quilt with pillow pocket down on your flat surface.
2. Fold the quilt body into thirds. (the long way)


3. Fold this long section in half, and half again.
4. Pull the bottom of the pillow pocket up and over this folded section,
turning pillow pocket 'inside out', over the body of the quilt.
5. Turn and pull into a nice pillow shape,pulling out corners completely.

My tag along verse:
"Use me as a pillow, until you get cold.
Then pull me out and gently unfold.
I'm a lap quilt now, from head to feet...
Then tuck me back in, all nice and neat!"
*Please Note:
If you borrow my directions and copy this down, make it or use my verse, I would appreciate a link back for all of my hard work in creating and sharing. Thank you!
For another version of a quillow that is more recently created, check out:
No time for a quilt? Make a Flillow!.......a Fleece Blanket + Pillow ;)
Want a really quick quilt look quillow?
Use a printed panel of any kind!
Quillow: Etymological Note: quilt + pillow
After posting a photo of
my 14 quilting projects...on two walls, in umpteen baskets, and on my design floor just a few days ago, I was reminded that a Great-Niece was graduating from High School and being honored with a family barbeque.
Here I am, 14 projects already started and none of them is either appropriate or can be quilted/finished in time for the party. I ended up with only 3 days to get the gifts figured out, designed, and sewed.
I have always given quilts to every child in our family -- nieces and nephews or at least their babies when the had them, and now great-nieces and great-nephews and several times I have given 'quillows' and they have been big hits! So...a quillow was decided upon.
My original tutorial on
How To Make A Quillow shows one of her cousins' quilt/pillow being made. But I decided to take photos as I went along for a second photo tutorial then maybe I could just made the next one on automatic pilot!
I used a simple quilt panel for my quick quilt, added some 5 1/2" borders all the way around, some co-coordinating fabric for the back panel and some stitch in the ditching for quilting.
I was delighted to discover that my panel was designed by Diane Phalen, who once lived in Banks, Oregon.
She also made lovely
quilting art cards and prints that many of us still treasure! So, it was great fun finding this favorite panel among my supplies! But if you have a nice quilt top all finished try using that for a wonderfully easy to finish quillow!

Materials Needed:
4-5 yards total of assorted fabrics for piecing
or 2 yds. for quilt top and 2 yds. for quilt back
1/2 yd. for pillow pocket (pocket needs to be 1/3 of width of finished quilt)
thin batting of your choice ( a twin batt, 72" x 90" will make 2 quillows)
Step 1: Cutting Directions
For the "pillow pocket" :
Cut as follows or pieces that measure 1/3 of width of finished quilt top:
(1) approx.18 " to 20" fabric square or pieced square in color 1 for top
(1) 18 " to 20" fabric square or pieced square in color 2 (or the same) for bottom
(1) 18 " to 20" fabric square of thin batting
For the "quilt" cut as follows:
(1) 45" x 72" piece (or pieced into blocks) of fabric for top of quilt
(1) 45" x 72" piece (or pieced into blocks) of fabric for back of quilt
(1) 45" x 72" piece of thin batting
*For a baby quillow, down size as desired, making pillow section 1/3 of total width of quilt
Step 2: Sewing the Pillow Pocket Together
1. Place batting on flat surface.
2. Place bottom fabric on batt, right side up.
3. Place top fabric piece on top of backing, right side down.
4. Pin together, stitch closed with 1/2", leaving an 8" opening.
5. Reaching into opening, pull out to turn pillow, shape corners and hand stitch opening closed.
6. Machine stitch a simple quilting pattern or hand tie to secure into a now flat pillow piece.
Step 3: Sewing the Quilt Body Together
1. Place batting on flat surface.
2. Place bottom fabric right side up on top of batting.
3. Place top fabric right side down on backing.
4. Pin, then sew closed with a 1/2" seam, leaving a 10" opening on one side.
5. Reaching into opening, pull right sides out, shape corners, hand stitch opening closed.
Step 4: Sew the Pillow Pocket to the Quilt Body (if quilting or tying is needed under it do that before attaching pillow to quilt!
1. Lay quilt body, back side up.
2. Center the pillow pocket, flushed edges together, positioning at the center section of quilt, wrong side of pillow pocket up, design nap pointing up towards outside edge. *pillow pocket final opening will be at the bottom of the pillow top, facing towards center of the quilt body as you look down at the backing. The 'right' side of the finished pillow is 'inside' and does not show on top at this point!
3. Sew only three sides of pillow down flat to quilt body, leaving lower pillow edge open (facing the center of the quilt, not the outside of quilt edge) to form pocket.
4. Secure the quilt layers together by either hand tieing or machine quilting every 9" apart.
Do NOT sew over the pocket!!! If need be quilt under it before getting to this stage!
You should now have a lovely finished quilt, with a pillow section on the back. This is a quillow. A quilt+a pillow=a quillow.
How to make it look like a pillow, you ask;) It's pure magic!!!
Folding the quilt into the pillow shape to create the quillow in 10 steps:
1. Take the quilt,laying it flat as shown above.
2. Fold over 1/3 using back pillow edge as guide line.

3. Fold over another 1/3 using back pillow other side as guide line.
4. Fold down 1/3 using top of back pillow as guide line.
5. Fold down again creating a square shape.You can see my elastic loops at the bottom edge.Using these with buttons on the other side of the pocket opening is a closure option.
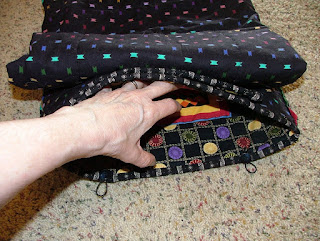
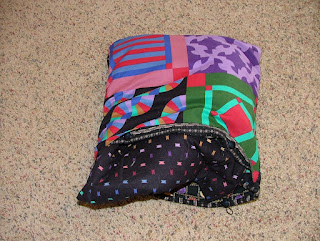
5.Using your hand, open up the inside of what will become the pillow section. You hold onto this edge as you reach within to pull the folded quilt sections into the inside of it and then inside out...like pulling through a case inside out.
6.Here it is beginning to emerge from the inside to the outside. The bright yellow strippy square is on the quilt front, you see as you pull it into the pillow.
7. And here the final step of pulling it out. Now you see the pink blocks that become the front of the little pillow form.
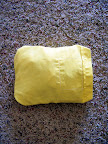
8. Almost a pillow!
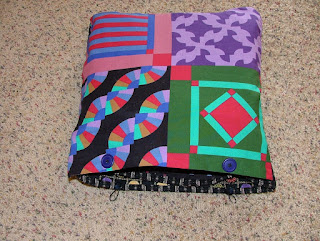
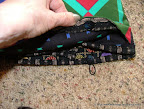
9. Now if you want buttons and loops, as you might see here, I added mine at this last stage by hand and just tacked them down.
Sew 2 bottons and two pieces of tied black elastic made into little button loops.
Button those elastic loops around your optional buttons hand sewn to the outside of the pillow bottom for closure..or you can just leave the pillow opening open, no buttons and loops, or use velcro tabs whatever you want!
As the pillow 'sits' on a surface, it is on top of this opening and it doesn't really show very much, anyway! But I added this last step as the gift was part of the quillow directions test I put into my hand made Graduation card for even more fun.
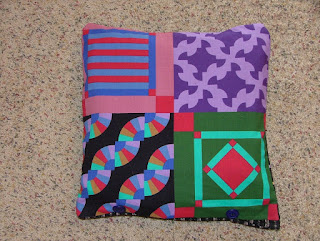
10. My quillow -- a little quilt that turns into a pillow!
Quicker and easier than it even sounds! I made the quilt, the pillow, and a cute bag with pockets, and and ID tag in less than three days. And yes, you can be that crazy productive, too ;)
Free Bag Pattern and ID tag tutorial
No time for a quilt? Make a Flillow! A Fleece Blanket + Pillow ;)
Make a Fleece Blanket or a Quilt that you Already Have into a Quillow!
Remember!
Any quilt or fleece blanket can be made into a pillow quilt by simply creating a pocket on the back.
For pocket: Cut out two pieces of fabric (or fleece) and one piece of batting about 18 1/2” square. It can be smaller if your blanket is smaller as your pocket should be about 1/3 of the width of the quilt or blanket you are using.
Now, place the fabric right sides together and place batting on top of fabric.
Sew all the way around (with batting on bottom), leaving an opening of 4” - 5” on one side to turn - this is the same method used for making quilts envelope style. Some quilters call this birthing a quilt or make a envelope style quilt.
Trim corners of the pocket and turn right side out. Stitch opening closed.
Place pocket at end of blanket and then stitch to blanket on three sides, leaving the top of the pocket open and not stitched for packing the blanket into it when you turn it into a
More ideas!
What else is similar?
My own shopping bag design: pocket pouched!!!'
Michele Bilyeu Creates
With Heart and Hands
as she shares her imaginative, magical, and healing journey from Alaska
to Oregon. Creating, designing, sewing, quilting, and wildcrafting...
from my heart and with my hands.


 'Once in a Blue Moon', there is a second full moon in the same month. Of if you believe in the Old Farmer's Almanac, there is an extra full moon that occurs in a quarter of the year, which would normally have three full moons but sometimes, has four! But whether you believe in the old or the newer definitions, or even in blue moons, it is actually the third full moon in a season that has four which is counted as the extra full moon and named blue moon. According to folk lore, it is said that when there is a blue moon, the moon has a face and talks to the items in its moonlight. Today, as you might have guessed by now, is a blue moon day! So, like many of you, I am talking to the moon today!
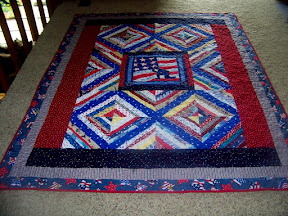


